Hairstylist Lizzie Liros created 5 stunning bridal looks in her recent collection, Runway Bride. Romantic, sexy and classic all at once, each look offers inspiration for any bride. Below, Liros shares step-by-step tutorials to help you recreate each style for bride-to-be clients!
Look 1:
front section of hair is pulled directly back away from the face.
4. Flip head upright so that the ponytail now looks like a cone.
5. Tuck the ends of the ponytail back into the body of the hair to hide the elastic and drop the hair to the side. The style will looks like its falling out, this is the desired effect. TIP: The teasing is what is holding the style together and given its fullness.
6. Lightly position any loose hair around the front of the face into place and finish with a light spray of White Sands Infinity Hair Spray to hold style in place.
Click through to see the 4 remaining looks and how-to's! [pagebreak]
Look 2:
br>5. Using an afro comb, gently brush the hair on a downward stroke until curls are blended to soft waves.
6. Sweep hair to right hand side creating a soft low ponytail and secure into place. Ensure hair at front fringe area is left free.
7. Smooth fly-aways and add shine with White Sands Smudge.
8. Lightly finger tease the ends of the hair to add texture to finished style. [pagebreak]
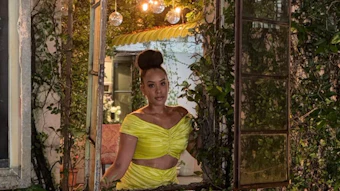
Look 3:
through hair to loosen the curl.
3. With a wide tooth comb, brush hair into a high pony tail at the temple area.
4. Divide the hair into 3 panels and plait each panel. TIP: If your client's hair is thin, attach a ponytail hair extension to the base of the ponytail elastic. Lizzie recommends Amazing Hair Australian hair extensions.
5. Gently stretch each plait to loosen and widen.
6. Position each plait as desired across the top of the hair and face, creating all your fullness on the crown and front of the head. Secure in place with bobby pins.
7. Pull out a few strands of hair to soften the style and create a whimsical flyaway finish. TIP: Do not apply any finishing product or hair spray to this style. [pagebreak]
Look 4:
 winding from roots to ends, starting at the nape. Continue until full head is curled.
4. Ensure hair is curled very tight. TIP: Do not stretch or pull on hair after winding as you want to keep a very tight curl.
5. Allow hair to cool for 10 minutes.
6. With a large tooth comb, or your fingers, gently comb curls to slightly loosen.
7. With a small tooth comb, gently comb out curls at the top crown section to create a smooth finish, not disturbing the curls in the lengths of the hair. TIP: Be careful not to disturb the curls too much and remember you can use your fingers to create more texture and separation. [pagebreak]
Look 5:
lternate between a tight curl (holding for 6-7 seconds) and looser curls (holding for 3-4 seconds), styling full head. TIP: Always use a tighter curl on the hair at the crown.
6. Allow hair to cool for 10 minutes before continuing styling.
7. Tip head upside down and run your fingers through to loosen curls. Then run a very wide tooth comb through curls to finish.
8. Give hair a good shake to loosen and spray with White Sands Infinity Hair Spray.
9. Turn head upright and, with fingers, tease end of the hair in an upwards motion to create the finished look.
Credits
Hair: Lizzie Liros; www.lizzieliros.com
Makeup Artist: Ann Hassarati
Photographer: Dario Gardiman