As the sun starts to shine longer and the weather warms up, we start to get busier and busier with events, be they parties, galas, a fancy date night out or weddings.
To get some ideas on some of the hottest special occasion looks, we went to six pros. Try these looks out on your clientele for their next big event, or use them as inspiration to create one of your own.
1. Textured Midi Bun
Jocelyn Emerson, Updos By Jocelyn (@updos.by.jocelyn)
 Textured Midi Bun by Jocelyn Emerson, Updos By Jocelyn (@updos.by.jocelyn)Courtesy of Jocelyn Emerson
- I created four stacked ponytails down the back of the head.
- I used the topsytail technique to redirect two of these ponytails to the right and two to the left - alternating directions.
- Next, I placed hair padding right down the center of the back of the head overtop of the ponytail bands and secured in place with bobby pins.
- To create my midi bun, I used the hair from the ponytails to create twists, alternating from each side, and placed them overtop of the padding and secured in place with bobby pins.
- To view the video tutorial, visit Emerson’s Instagram page.
2. Romantic Fishtail
Haley Garber (@beautybyhaleygarber)
This soft and sweet hairstyle brings a touch of romance by braiding in a hair vine. The longer the hair, the more whimsy the look, so shoot for mid-shoulder length or longer hair.
 Romantic Fishtail by Haley Garber (@beautybyhaleygarber)Courtesy of Haley Garber
How-To: Romantic Fishtail
- Begin by applying a smoothing cream through the hair to help add shine and control.
- Create one to two topsy tail ponytails and pinch and pull to add as much volume as texture as you’d like. This gives long lasting volume through the crown and creates a guide for your braid.
- Place the hair vine as a headband and allow the sides to lay on top of the remaining hair.
- Carefully divide the remaining hair into two sections, keeping the hair vine placed on top. Begin a fishtail braid, selecting hair from the outermost portions of the sections and gently crossing them over. Every couple of passes, gently incorporate the hair vine, always keeping it on the top layer of hair. Be careful to not create a strong tension through the braiding process. It is easy to accidentally tangle the hair vine in this process, which creates frizz, and keeping a medium tension helps to keep any tangling at a minimum. Keeping the hair detangled while braiding also helps with creating a smooth and clean finish.
- Towards the end of braiding, you can begin to fluff up the braid gently by working from the bottom to the top. The hair vine will help the braid keep its shape as it locks into the strands of hair. Finish by wrapping the tails with an elastic.
3. Classy Pony
Casey Powell, Updo Guru (@updoguru)
Well done Ponytails are still a major trend of 2023.
 Classy Pony by Casey Powell, Updo Guru (@updoguru)Courtesy of Casey Powell
How-To: The Classy Pony
- To create a perfect ponytail, I work with two ponytail sections when creating the base and then again when creating the volume in the tail itself.
- I think about where I want the ponytail to sit on the head, and I create an inner circle with the majority of the hair, and tie it off with a traditional ponytail elastic, then curl the hair in that ponytail.
- With the remaining hair, I begin my prep of crimping, teasing and curling. With one hand under the original ponytail, I am going to use my boat bristle brush to smooth the remaining hair into my hand around the first ponytail and tie off using a bungee method.
- Now, I’m going to create more substance in the ponytail by dividing it in two, clipping away the top half, crimping and teasing heavily at the base as I move my way up to create a good foundation that won’t let the ponytail collapse.
- Dropping the remaining section, I am going to use my fork comb and tease as needed to get just the right amount of volume.
- Finally, going in to pinch pull sections of the ponytail to create movement and airiness, then still while pinching, smooth with my fork comb to define curls and ends.
4. Sleek Dazzle
Brendnetta Ashley, JCP Salon (@edgybgirl)
Special occasion styling now has a minimal, yet impactful look and feel to them. Embellishments are always a great way to dress up your hair. I took this silk press to the next level with these dazzling embellishments.
 Sleek Dazzle by Brendnetta Ashley, JCP Salon (@edgybgirl)Courtesy of Brendnetta Ashley
How-To: Sleek Dazzle
- Once you have completed your silk press, create a center part.
- From here, section the hair from the crown of the head to behind the ear. Clip the back of hair for the moment.
- Smooth the two front sections.
- To keep and maintain the hair, once smoothed, gather the two sections towards the lower nape, and secure with an elastic band.
- Once secured, use a working hairspray for hold. Then, take your gem stickers and organically place them where you see fit.
- Once you have your placement, finish with your working hairspray. It’s a fun easy look that works for any special occasion!
5. The It Girl Bun
Marissa Brennan, Marissa Grace Artistry (@marissagraceartistry)
 The It Girl Bun by Marissa Brennan, Marissa Grace Artistry (@marissagraceartistry)Courtesy of Marissa Brennan
For this style, think Pam Anderson but make it bridal. This look is a nod back to the early 2000s when Pam gave us her iconic high bun style. Then Kim K wore it during fashion week in 2022 with her Dolce & Gabbana campaign, and she had us in a chokehold with this look. It’s not your average stuffy ‘bridal high bun’ that’s structured with ringlet curls. Rather, it’s a sexy top knot that looks like you effortlessly threw it up yourself before heading out to cocktail hour. Paired with the sexy and relaxed face framing, it makes my brides feel like the it girl of the night walking into their reception. Well, because they are the moment with this it girl bun.
6. Modern French Twist
Amie Taylor-Kent, Mon Amie Wedding Hair (@monamieweddinghair)
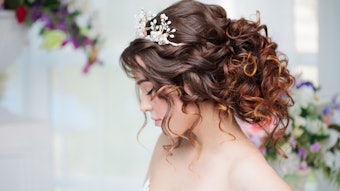
This seasons go-to style is a fresh take on the ‘90s French twist. The original look famous in the 90s has made a return to our screens recently. It’s quickly becoming a popular style in the bridal world for 2023. This look can be achieved in many ways and can be either tamed downed and neater.
 Modern French Twist by Amie Taylor-Kent, Mon Amie Wedding Hair (@monamieweddinghair)Courtesy of Amie Taylor-Kent
How-To: Modern French
- To create this version of the look, I would lightly curl the hair using a 24mm wand or tong, I like the smaller barrel as it helps to create that texture we’re looking for. I use a mixture of a wet pump hairspray before I curl, such as Perfect Silhouette Spray by Schwazkopf. Then, I’d separate the curls by using Tame Wild by Schwazkopf. This technique defines, separates and smooths out the curls, giving them that hint of ‘90s look.
- Once the hair is curled, I use my fingers to separate some of the hair at the front on both sides (these pieces will join the hair later and create another textured layer onto if needed).
- Drag all of the hair at the back to one side, then with bobby pins secure a vertical line of hair pins slightly overlapping each other so the hair stays firmly over to one side of the head. Make sure while you’re doing this not to lose the curls, so don’t pull too tightly!
- I then separate the remaining hair at the back into 2 or 3 sections (depending on hair thickness) horizontally and gently roll them back on themselves, so the hair is now in a roll shape at the center of the back of the head. These are pinned in place, ensuring all bobby pins are hidden!
- Then, decide how much hair you want to bring into the style from the front and how much you want to leave out around the face, gently secure the sides into the back again and maintaining the curls so they are not pulled too tightly.
- Finish using a shine spray.
- Decorate your style with some hair jewelry. I used these gorgeous bridal hair pins by Love2Sparkle. Fresh or dried flowers would also elevate this style and give it that special occasion feel.


