Artist: Edie Noppenberger | Salon: Edie’s Styling Center | Photography: Tom Carson
(Click the page numbers below to see each step)
[pagebreak]

Step 1. Beginning with a natural level 7 with 3" re-growth and pre-lightened ends.
The end goal is to have a level 9 base with soft, natural-looking highlights.
After determining the clients preferred part line, begin in the front of the hairline on the part.
Balayage strokes are applied after lifting each section up and out from the head to determine the natural movement.
Doing this step helps to accentuate and emphasize the intended finished style.

Step 2. Using the same technique of lifting the sections and determining the point of origin for each, continue working along the hairline.
Get more hairstyle step-by-steps in INSPIRE Technical Guides • Get a FREE Technical Guide with each INSPIRE, the best-selling professional hairstyling books in the U.S. • Watch INSPIRE DVDs for more hair style how-tos

[pagebreak]

Step 3. When applying to the sides, it is important to also lift and sweep the hair up to avoid stripes on the sides.

Step 4. After applying the product to the front and sides of the head, continue towards the crown along the part line.
It is also important to have corresponding highlights on each side of the part, but without making exact duplicates.
[pagebreak]

Step 5. Continue working from the front to back remembering to visualize the movement of the finished style and the client’s preferences for wearing her hair.

Step 6. When applying the back crown section, be aware of the length of that hair and how it will lay on top of the other hair.
[pagebreak]

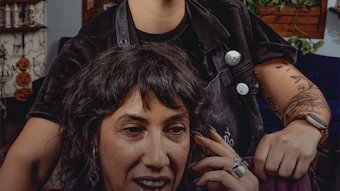
Step 7. Applying the product to the hairline in the back requires the same technique and visualization process used for the front hairline.
This will allow the client to pull her hair up and see consistent highlights.

Step 8. Work from the center of the head to the ears, carefully applying product to the fine hairs and natural points that make up the hair line.
[pagebreak]

Step 9. After working from the back hairline up to the crown, lay the hair down so you can have a clear view of how the highlights are going to look with the finished style.
It is often necessary to apply the product all the way to the ends to produce a more blended, even and consistent tone. Using the mirror is beneficial for viewing this process.

Step 10. Apply a loose fitting bag to the entire head and place the client’s head under a dryer, lifting the hair to a level 12.
[pagebreak]

Step 11. Blow-dry the hair for soft movement using a nozzle to control the airflow and a 1" metal round brush.

Step 12. For more volume and curl, use Velcro rollers.
[pagebreak]

Step 13. When removing the rollers, lift the hair up and unwind each one to prevent pulling and tangling.

Step 14. After the rollers are removed, break up the curl using your fingers with a little added hair polish for curl definition and shine.

Step 15. Continue pulling the hair up and combing with your fingers to maintain fullness and curl.
[pagebreak]
Final Photo:

End Result: Soft, natural-looking blonde-on-blonde that will have a minimal re-growth line and can be easily maintained.
Get more hairstyle step-by-steps in INSPIRE Technical Guides • Get a FREE Technical Guide with each INSPIRE, the best-selling professional hairstyling books in the U.S. • Watch INSPIRE DVDs for more hair style how-tos