
It’s no secret: Eyebrow enhancements are all the rage. Just look to Instagram for proof. With more than half a million #eyebrowtattoo hashtags and a whopping 5.3 million #microblading hashtags it’s no wonder that the demand for semipermanent eyebrow services has skyrocketed. Perhaps that’s because the days of Sharpie-like eyebrow tattoos that left red, green and purple arches are, thankfully, a thing of the past. Today’s clients can take solace in knowing that the current cosmetic brow tattoo services will award them with the no-fuss, flawless semipermanent brows they desire. While microblading might be the trend de rigueur, it shouldn’t be the only service you put on your menu. Here, we quizzed industry pros on the ins and outs of up-and-coming microfeathering and microshading services, as well as the mega-popular microblading, so you can put your best eyebrow forward in an industry that continues to grow.
Technique Rundown
“There are only two ways to enhance brows with permanent makeup: one is to make hair strokes; the other is to create a powder-like effect,” explains Los Angeles-based Microblading LA founder and celebrity microblading artist Lindsey Ta. While both methods can technically be performed using either a manual tool or a rotary or digital permanent makeup (PMU) device, according to our pros, you’re only in fact “microblading” when implanting pigment into the skin using a manual tool, whereas some agree that “microshading” can be executed using either apparatus. It’s important to note that when you opt for a PMU device for shading, which is similar to but less aggressive than a tattoo gun, the terms used may differ depending on who you speak to, such as “powder,” “shaded” or “ombré” brows.
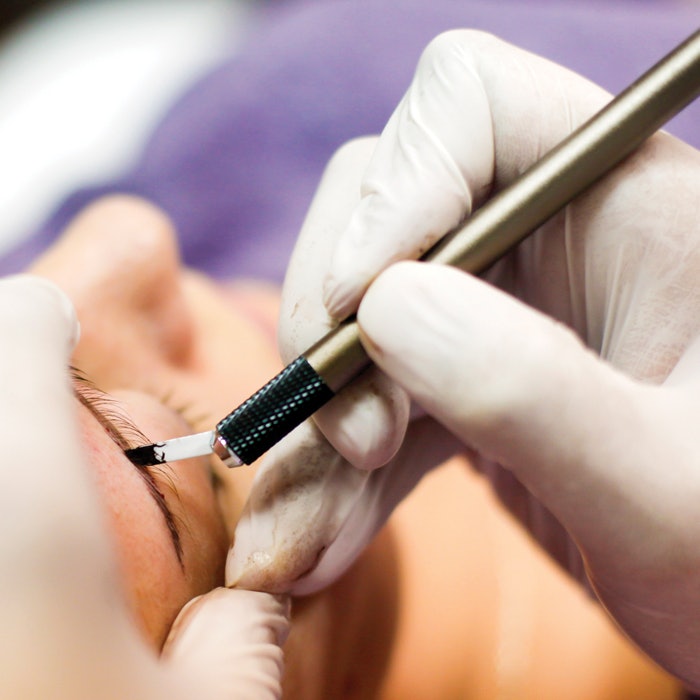
The burning question: What exactly is microblading? It’s simply the art of using a manual tool with 7 to 21 fine needles lined in a row to slice hair strokes into the brow that perfectly mimic real brow hair for a natural look. “The pigment is deposited superficially in the upper region of the dermis by making tiny cuts in the skin and then placing and massaging pigment into those cuts,” explains Nouveau Contour USA Academy head instructor Karen Dionis. The same theory applies to microfeathering, a microblading concept developed by Beverly Hills, California-based STRIIIKE cofounder Kristie Streicher as a natural extension of her The Feathered Brow philosophy. The difference in the techniques lie in the size, amount and placement of the strokes. Think: smaller, thinner hair stroke incisions that fill in gaps of natural hair that’s grown out for 4 to 12 months pre-procedure. The result is an even more organic look. “Microfeathering isn’t a three-dimensional procedure, so it’s not meant to create an entirely different brow, but more of a way to fill in sparse areas of hair,” Streicher explains. “The strokes [should] truly look as fine and natural as the native hair. ... You shouldn’t be able to differentiate between the [two].”
RELATED: 8 Challenges Every Newbie and Veteran Lasher Needs to Tackle
While microblading and microfeathering boast similarities, microshading stands on its own. Not only do the needles come in various shape and size 1-to-9 cluster configurations, says Ta, but the pigment implantation method also differs. “Microshading uses the stippling effect, which is the repetitive pinpoint dots of pigment,” explains EZ Permanent Makeup owner Genie Schmidt. When the ink spreads, it elicits a powdery effect, which may be the perfect fit for clients who draw on their brows on a daily basis. “It can mimic powder, pencil or gel—it just comes down to how bold or soft [clients] want their eyebrows to look,” says Ta, who advises starting conservatively and adding more at the touchup appointment if needed. Your tool of choice may depend on how much work you need to do. “If I only need to add a little shading, I’ll use a manual tool, but your hand can get tired doing a full brow with it,” explains Ta. That’s because with shading, you’re making the same motion in the same area over and over again. A PMU device allows you to move in and out and penetrate the skin at a speed of 70 to 180 punctures per second, explains Dionis.

Certainly microblading is the on-trend word of the moment, but clients don’t often know the difference between the service they want and the service they need to get the desired results. As a pro, you must assess your client’s skin, amount of brow hair and whether they’ve had other treatments in the past. With microfeathering, for instance, all preexisting eyebrow tattooing must be completely faded before starting the service. “With a [micro]feathered brow there is a natural lightness where you can see a bit of skin between the hairs [and strokes]; it’s not overfilled or solid like the ‘Instagram brow,’” explains Streicher. “If there’s an existing dark line or tattoo in the skin, this look cannot be achieved.”
Clients with oily skin or large pores are not the best candidates for microblading, and you might suggest microshading instead, which suits any skin type. “Since the pigment is placed in the dermis, which is same layer of skin where oil is produced, it can cause the pigment to migrate over time and make the hair strokes look blurry, [whereas] with microshading, the color is meant to blur and fade to create a soft, powdery look,” explains Ta. “As for pores, if they’re too large, it’s more challenging to get pigment in evenly, so the strokes will heal inconsistently.” Hair stroke retention also proves difficult for those with sensitive and mature skin. The ideal client: “Someone with youthful, healthy, virgin skin,” says Dionis.
Keep in mind that health, skin or otherwise, plays a big role in determining which technique is best for your clients. A good rule of thumb: Conduct a thorough consultation prior to scheduling a procedure so you can figure out what kind of results you’ll be able to get moving forward, and then manage their expectations, says Occhi’ Lash & Brow Studio owner and master trainer Lynn La Palermo, who also advises having clients fill out a medical form, and if there’s any question on safety, ask for a doctor’s note.
RELATED: How to Correctly Answer Tough Eyelash Questions From Clients
Long-Term Results
Shaded brows will net clients anywhere from one to three years of wear, while microblading or microfeathering services result in roughly 8 to 12 months. It all comes down to the healing process and implement used. “With a puncture [made by a device] the skin heals surrounding the pigment, encapsulating it in the dermal layer of the skin,” explains Dionis. “With microblading, the skin heals starting at the bottom of the cut and pushes pigment to the top, up through the epidermis. ... Only pigment that settles in the upper dermis remains.” You’ll also want to give your microfeathering clients a heads up that they may need to see you even sooner. “It may not last as long as microblading because the pigmented strokes are much finer and natural-looking,” explains Streicher.
At the end of the day, lifestyle and how the client cares for her arches affect pigment retention. You don’t need to push sun worshipers or outdoor enthusiasts away, but you must teach them—and all clients—how to prevent premature fading by using sunscreen and following a proper aftercare regimen.
Know Your Worth
With price tags ranging anywhere from $400 to $1,200 for eyebrow tattoo services, there’s no doubt that you’ll reap financial rewards. But when setting your prices, begin by determining how you stack up against the local competition. “You’ll want to ensure you’re not too low or undershooting your competitors,” offers Ta. Your experience and time also matter. “There’s only one artist like you, so when you have more experience and your time becomes limited, you have to charge more,” she adds. Another smart strategy: Base your prices off the amount of work required based on your individual client’s brows. “It’s the most fair thing you can do for the consumer,” says La Palermo. “It would be unfair to charge the top price to someone who has 75 percent of her brow and the same price to a woman who has no brow.” That doesn’t mean you should become a markdown business. “Even if less time is involved, you need to take all of the tools and disposables necessary to do the service into consideration,” she adds.
If you’re new to the business, don’t make that known in your prices, as it could put a preconceived notion into your client’s head that your work is not up to par. “It can open up the door for a host of problems and the artist may get taken advantage of,” La Palermo says. Instead, practice for an extra month and offer a special for the first month you’re in business, she suggests.
The first touchup, generally four to eight weeks post-procedure, should be included in your initial appointment price, especially if you’re a newbie. “It’s very rare for a new artist to get it right in one appointment—it usually takes two,” says Ta. If the client comes back yearly for touchups it’s standard to charge half-price, but if they wait too long and push it to three years, they should pay the full amount, says Dionis.
RELATED: 12 Bold Eyebrow Moves That Will Help Your Clients
Education Fundamentals
Before you put needle to skin, you must get the proper certification and licenses, which can vary by state and method. “Check with your health board; they should be able to tell you the regulations and state requirements,” advises Schmidt. Also a big help: organizations such as the Society of Permanent Cosmetic Professionals and American Academy of Micropigmentation. “Things change constantly, and they set a lot of the standards,” says Dionis. Some things to put on your state checklist: training hours, tattoo license and blood borne pathogen requirements.
When it comes to choosing a training facility, don’t nickel and dime it. “You get what you pay for,” warns Dionis. After all, you don’t want your lack of training to cause irreversible damage to your clients’ skin. It’s good practice to vet any schools you’re interested in first. Find out if the instructors have a good reputation in the industry. Look for schools with 100-hour course loads that include fundamental training, such as color theory, skin anatomy, contraindications, equipment safety and the basics of tattooing in general. Make sure you like the school’s work since it’s the style you’ll be learning, and ensure that you’ll get individualized attention with a low instructor- to-student ratio. Finally, look into any mentoring programs post-graduation. “When you’ve got a lifeline, it’s reassuring,” says La Palermo. “Students shouldn’t feel like they’re out there alone.” When in doubt, pick the brains of former students. “Talking to someone who already took the class will give you more of an insight,” says Schmidt.
After school, practice, practice, practice. “Artists should be practicing their technique daily on pads and for at least two to three months before working on models,” says La Palermo. “You need to be committed to it [to become successful]!”

Your artistic skills no doubt reign supreme when it comes to your eyebrow enhancement craft. But what would an artist be without her trusty tools? It’s a no-brainer that you must arm yourself with the implements necessary to create the actual tattoo—needles, handles, devices and pigment— but it’s imperative that you’re also able to map perfect brows, keep clients comfy and run a sanitary practice. Here, a rundown of some of our favorite tools that will have you on your way to constructing flawless arches in no time.
Needles
When it comes to microblading needles, you’ll be faced with two options: pliable flex needles and hard needles set into a metal base offering zero shock absorption. “I have my students work with flex needles,” says La Palermo. “They have more flexibility, which lessens the chance they will push down too deep or hard.” This can cause the pigment to turn cool-gray and create mottled strokes, she explains.
Handles
Whether you choose to work with disposable handles or a stainless steel base, it’s simply a matter of preference. “The steel tools can be very heavy and add weight, which then adds weight to the skin,” says Ta. “For me, when the tool is lighter, it’s really true to my pressure on the skin.”
PMU Devices
PMU devices definitely cost way more than blades, “but you can’t beat the precision and accuracy of them,” says Dionis, who likens them to the meticulousness you’re awarded with sewing machines versus hand stitching. The cream-of-the- crop: German-engineered digital devices run by a microprocessor, she says. “There are many devices that are less expensive and do a great job as well, but stay away from bargain hunting on the Internet— there are many counterfeits!”
Pigment
Don’t skimp when it comes to pigments, as the quality speaks to its staying power, says La Palermo. Her advice: Look for companies that have been producing pigments for at least five years. “This way, you’ll know they haven’t just started producing pigments to capture the new popular procedure.”
Rulers
Once you’re a pro, you likely forgo rulers, but when you’re starting out they can come to your aid. “You need to be able to find the center of the face on your own and have a deep understanding of facial symmetry and brow shaping. After that, tools like rulers can help you,” says Ta.
Topical Anesthetic
When packed with ingredients like lidocaine and epinepherine, topical elixirs not only provide clients pain relief, they also can reduce bleeding and swelling, which will help you to see your work better, says Schmidt. But you want to be aware of any changes to skin they can cause. “It can make the skin thicker and have more resistance,” notes Ta.
Disposables
From latex gloves and masks to bouffant caps and bedspreads, you’ll need to be fully stocked on your sanitary supplies—otherwise, you run the risk of your clients getting an infection. “Your facility can gain a bad reputation and, if reported, the state should and will step in,” says La Palermo.
Prep & Afercare Lowdown
There are a lot of dos and don’ts when it comes to prep and aftercare. Here, a general list to follow.
Pre-Procedure:
- No blood thinners, including alcohol, caffeine, fish oil and medications 48-72 hours beforehand. “Any of these can cause excess bleeding and make the appointment very difficult or even impossible,” says Lindsey Ta, founder of Microblading LA.
- No retinols or harsh treatments two weeks prior.
- No chemical or laser peels or Botox treatments six weeks prior.
- No waxing or plucking at least three days prior.
Post-Procedure:
- For 7-14 days no sun; sweating; excessive water; makeup in the treated area; laser, chemical or peel treatments; drinking alcohol in excess; or scrubbing or picking.
- The jury’s out on whether to do a dry or wet heal so use your professional opinion and experience when advising clients. No matter what you choose, stress the importance: “Aftercare can make or break your work,” says EZ Permanent Makeup owner Genie Schmidt. “If your clients ignore it, the pigment will come out and won’t look right at all, but if they follow it to a T, it will last so much longer.”
- Do wear sunscreen on brows every single day—even when it’s cloudy or snowy—to prevent premature fading. “You can always tell when a woman doesn’t wear sunscreen when she comes in for a touchup,” says Lynn La Palermo, owner of Occhi’ Lash & Brow Studio. “Her left eyebrow is always faded more than her right from driving in the car.”
Pro Tips
- “If you pick at the scabs, you can create scars, which will mean even future touchups won’t look right,” says Ta.
- “With a wet heal, don’t use healers with smaller molecules, like Grapeseed or coconut oil, as they will dilute the pigment,” says Dionis. A better bet: Aquaphor or petroleum, which can help to prevent itching ... and picking!
[Images: Getty Images]