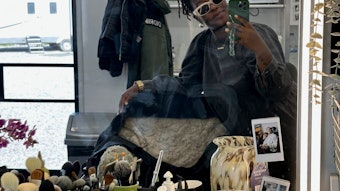
Hair: Diadema | Art Director: Fabio Messina | Photography: Andrea Rainoldi
Makeup: Cristina Marzo per 20100Milano | Stylist: Chiara Tubia | Extension: Zeropiu
(Click the page numbers below to see each step)
[pagebreak]

Step 1: Isolate the upper area from 3⁄4 inch above the right eyebrow to 3⁄4 inch above the left eyebrow, passing by the crown.

Step 2: Comb the hair straight down and point cut across the hairline, two fingers from the scalp.
Get more hairstyle step-by-steps in INSPIRE Technical Guides • Get a FREE Technical Guide with each INSPIRE, the best-selling professional hairstyling books in the U.S. • Watch INSPIRE DVDs for more hair style how-tos

[pagebreak]

Step 3: Cut up the sides to mid-ear on both sides.

Step 4: From mid-ear, lengthen towards the chin making sideburns on both sides.
[pagebreak]

Step 5: Top–Along the upper division, begin cutting from behind at the occipital height with a point cutting technique.

Step 6: Continue on the sides toward the middle of the eye.
[pagebreak]

Step 7: Layers: Blend the top to the hairline starting on the right side.

Step 8: Blend around the entire head.
[pagebreak]

Step 9: Let the top section down and comb it all forward.
Create the fringe by starting on the left side, cutting straight across to the middle of the left eye.

Step 10: From the middle of the left eye to the middle of right eye, cut in a lengthening diagonal.
[pagebreak]

Step 11: From the middle of the right eye, go straight pulling out.

Step 12: Divide with a left part and from ear to ear.
[pagebreak]

Step 13: Layer–Starting on the right side, using the top as a reference, cut out to create a disjointed look between graduations and layers.

Step 14: Continue in the back.

Step 15: Use the same technique on the left side.
[pagebreak]

Step 16: Finishing touches–Part the hair on the left.
Take diagonal sections and thin with thinning scissors along the whole length.

Step 17: Use the same technique around the entire head.
[pagebreak]

Step 18: Take the layered sections again and thin from underneath with thinning scissors.

Step 19: Thin all of the fringe free-hand with thinning scissors.

Step 20: Free-hand thinning all of the lower parts as well.
[pagebreak]

Step 21: Styling–Begin at the crown with diagonal sections.
Roll at the roots and let the ends fall.

Step 22: Complete the entire head following the direction of the texture.
[pagebreak]
Final Photos:


Get more hairstyle step-by-steps in INSPIRE Technical Guides • Get a FREE Technical Guide with each INSPIRE, the best-selling professional hairstyling books in the U.S. • Watch INSPIRE DVDs for more hair style how-tos