Brace yourselves, the bowl cut is BACK!
Sometimes called the mushroom cut or shaggy bowl, this silhouette is short with the front, sides and back being the same length (similar to the perimeter of a bowl) and the hair on top is left longer. Worn straight, it can be chic or nerdy, and adding texture creates a more organic or even punk vibe.
“All trends are inspired by elements of the past mixed with current fashion, lifestyle and social influences. It’s that constant evolution of our points of view that keeps style exciting,” says Sam Villa, Co-founder and Chief Creative Officer of Sam Villa and Global Artistic Ambassador for Redken.
Predicting hair trends is both an art and science. It involves analyzing current hairstyles, fashion, pop culture, social media and lifestyle.
“The key to curating your point of view is to constantly be motivated to try new things,” says Teresa Romero, Sam Villa Creative Director and Jose Luis Salon Artistic/Ed Director.
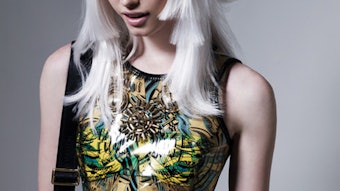
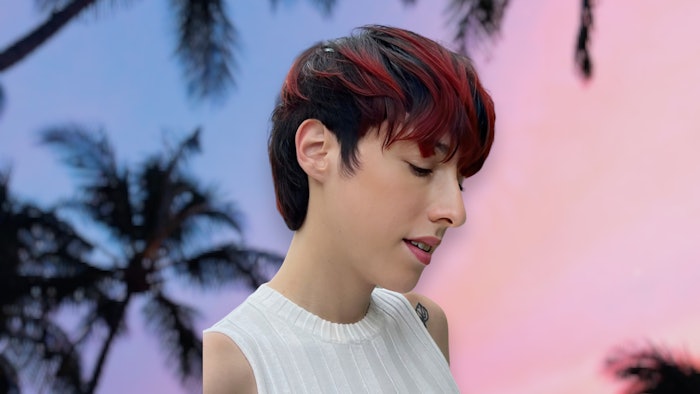
In this collaboration, Villa and Romero were inspired by a traditional bowl cut and the carefree layers of a grown-out pixie. This hybrid cut of precision foundations and textured layers can be worn in multiple ways and easily adapted to different face shapes and hair types. The precision perimeter provides structure and definition, while the shaggy layers add volume and depth to the interior.
 Hair/Sam Villa and Teresa Romero; Photographer, Makeup, Creative Director/Teresa Romero; Model/Misha Pahl.
How-To:
- Isolate the front fringe area from the rest of the hair, and in natural fall and without tension, cut fringe to just below the eyebrow.
- Keep the interior of the sides full by combing hair straight down. Clean up the perimeter around the ears and temple area. Finish by personalizing the side burn.
- Elevate hair straight up, and with vertical and horizontal partings, angle shears slightly and point cut to add airy movement to the ends.
- Comb all of the top hair forward and slide cut in a crisscross pattern to create additional root movement.
- Wrap dry with a finishing brush and professional blow dryer for a polished straight finish, or add texture and waves on the go with a flat iron.