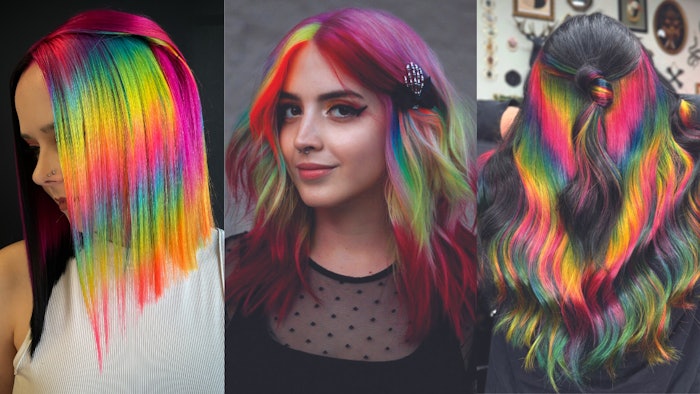
We have seen no shortage of captivating and creative vivid color combos over the past few years. The skill level and ingenuity that these stylists employ is evident, so we decided to bring together a collection of rainbow vivid looks by some of the industry's best. Although the pictures are definitely worth the price of admission, check out these artists step by step directions and dip your toe into rainbow vivid creation.
Sunset Paradise
Amanda Lyberger, @thehairygodmotherr
 Sunset ParadiseAmanda Lyberger, @thehairygodmotherr
Formulas:
Pink: 1/3 PRAVANA Chromasilk Magenta, 1/3 PRAVANA Chromasilk Neon Pink, 1/3 Manic Panic Hot Hot Pink
Orange: PRAVANA Chromasilk Neon Orange with a splash of Manic Panic Hot Hot Pink
Yellow: 1/3 PRAVANA Chromasilk Neon Yellow, 1/3 Pulp Riot Firefly, and 1/3 conditioner Tip: I do this to minimize bleeding because the PRAVANA neon yellow is very strong.
Green: 1/3 PRAVANA Chromasilk Neon Green, 1/3 Pulp Riot Neon Electric Area 51, 1/3 conditioner, and a dollop of Pulp Riot Blue Muse
Blue: 1/3 Pulp Riot Blue Muse and 2/3 conditioner
How-To:
Step 1. I split the application into two major sections. On the bottom half of the head, which I sectioned horizontally from below the parietal ridge to just below the crown section, I applied a simple pink to orange color melt.
Step 2. On the top section of the head, I took 1/4-inch partings starting at the front hairline and over directed towards the face. I sometimes use foils for this, but I also like using clear film so that I can base the start of the prism on the client's features and the client can see what’s going on. I painted pink for about 4 inches, or to just below the clients eyebrows, and then I started on the rainbow.
Step 3. I painted the pilot section in rainbow order, gently sweeping each color into the next, letting each shade take up about 3/4-inch before painting the remaining length of hair orange.
Step 4. Every section after the pilot section I over directed forward to lay flat on top of the first section – painted the pink first – lining the placement up with my pilot section. Then, I moved on to the other primary colors. I always try to place the primary colors first whenever I’m doing rainbow looks to avoid getting the secondary colors on my primary colors brushes, which clouds the color.
Step 5. After letting the fashion colors sit for 20 minutes, I then rinse out in the highest water pressure I can get at the coldest temperature the client can stand.
Hidden Rainbows
Jen Guido, @jenthehairmagician
 Hidden RainbowsJen Guido, @jenthehairmagician
Step 1. I started with a Malibu C pre-treatment (CPR), as this client was coming in with layers of permanent red dye in her hair. CPR helped get off some of the pigment and prepped it for lightening.
Step 2. Next, I colored the top halo section and the nape area with permanent black. I lightened the middle section. I blended the lightener up near the root but not a full on the scalp application to allow a lower maintenance grow out. I used OLAPLEX in my lightener formula for extra security.
Step 3. I held the lightened area out of the way and rinsed the black sections first, then followed with the lightened section.
Step 4. I shampooed, then followed up with OLAPLEX No. 2.
Step 5. After rinsing and shampooing again, I blow dried the hair and went in with my vivids. I clipped the black sections away, over directed the lightened hair towards her face and painted rainbows.
Step 6. After processing for about 30 minutes (or until the vivid dyes are firm and don't stain when you touch), rinse with super cold water to avoid bleeding.
Step 7. Blow dry and style!
Pink Prism
Valerie Supczak, @supvalerie
 Pink PrismValerie Supczak, @supvalerie
Products
L'Oreal Professionnel Blond Studio
Brazilian Bond Builder
Pulp Riot Blush
Pulp Riot Neon Electric Candy
Pulp Riot Cupid
How-To:
Step 1. Begin by mixing L’Oréal Professionnel Blond Studio with 20vol. developer and Brazilian Bond Builder. Apply to roots.
Step 2. Wash out hair using a purple toning shampoo and conditioner. Rough dry until hair is almost dried.
Step 3. Section out a mohawk section on top that will be the rainbow veil. The hair on the bottom will be a solid color mixture of of Pulp Riot Blush, Candy and Cupid.
Step 4. To start the rainbow prism on top, over direct the hair towards the front of your client's face. Begin by taking thin slices and alternating your rainbow colors pattern. My mixtures for each color included PRAVANA and Pulp Riot vivid colors. The rainbow sections must be small and thin to create a prism.
Step 5. Follow the same pattern until you are finished with the Mohawk section, all over directed towards your client's face. Process for 20 minutes.
Step 6. Wash out with color safe shampoo and conditioner (use cold water).
Step 7. Style with Brazilian Bond Builder Ionic Color Lock Spray, Leaf and Flower 7 Minute Blowout Spray, CBD Instant Frizz Remedy and CBD Phyto-Molecular Oil. Prep with Kenra Professional Platinum Dry Texture Spray 6, then wave with a Mint Tools XL Curling Iron. Run fingers through the hair to break up the curls.
Color Party
Amanda Epstein, @amandaepsteinhair
 Color PartyAmanda Epstein, @amandaepsteinhair
Products and Formulas:
Pulp Riot #blondeAF Powder Lightener
Pulp Riot Blank Canvas
Rainbow: Pulp Riot Blue Muse, Area 51, Lava, Firefly and Blush
Red: First Base + Fireball
Orange: Lava
Yellow: Firefly
Step 1. I started with #blondeAF Powder Lightener + 20 volume at the root area.
Step 2. I then ran Blank Canvas with 6 volume through the ends. I do this to give myself a nice even canvas and to remove any old existing color. Next, and probably the most important step, is sectioning.
Step 3. When I do rainbow color or any multi-colored look, I always like to plan my sections out, so I have a game plan and can help to organize and keep everything clean. For this particular look, I sectioned out the front sections for the “money piece” look. Then, I took a horseshoe section around the crown. Each of these I pinned away, so I can create the rainbow on the rest of the hair.
Step 4. I like to start at the bottom and work my way up, so I separated the remainder back and sides into four sections and took horizontal sub sections, working my way up to the top and stopping at the horse shoe section. Each sub section, I start at the base with Blush and paint the hair flat onto a foil. Then, on the ends, I applied my red formula. In between, I painted my rainbow. Sometimes I utilized all the neons, and sometimes I just used Blue Muse and Area 51 or Lava and Firefly.
Step 5. Once I finished that, I took down my horseshoe section, separating everything with foils. I applied Blush from roots to ends.
Step 6. For the money piece, I picked one side and did a Lava and Firefly color block. On the other side, I did a root tap with Blush, then melted the red formula into that through to the ends.
Step 7. I processed for 30 minutes, rinsed with cool water, did a quick trim and style and voilà!
Rainbow Side Swipe
Cyrell Nors, @hair_by_love
 Rainbow Side SwipeCyrell Nors, @hair_by_love
Products
Oligo Pro Backlight Lightening Cream
Kevin Murphy 1N
Pulp Riot Vivids
How-To:
Step 1. I started by doing a standard bleach retouch on 1.5" grow out. This was done using Blacklight Lightening Cream by Oligo and 20 vol.
Step 2. For the black money piece, I used 1N Kevin Murphy permanent with 10 vol. I applied the money piece and tipped out the right side of the bob.
Step 3. I started the unnatural color application by doing vertical rainbows in 1.5" sections starting in the back middle. This application consisted of only tipping out her bob with the rainbow using a board to paint the vertical colors on.
Step 4. Next, I washed and blowdried her hair to start the pink application and the rainbow money piece/prism section. I took out the money piece and added a "C" section above the left ear for the prism. I started in the back with the pink first, and, as I approached the rainbow tips, I used a clear semi permanent to blend into the rainbow without muddying the colors.
Step 5. Next, I started at the back of the "C" section on the rainbow prism. This technique typically requires overdirecting the opposite direction of which the hair will lay when it is finished, meaning I took a small section at the back of the "C" section that I could see through and overdirected it straight back toward the back of the head. Starting at the ends, I painted the first color of the rainbow in straight across 1" blocks as I moved through the rainbow toward the scalp.
Step 6. Keeping that section overdirected backwards, I took the next see-through section and laid it directly on top and painted over the same colors of the rainbow starting at the ends. I repeated this until I got through the entire section. I made sure to dilute my vivids with clear to make sure the colors wouldn't bleed through and stain the previous sections.
Pastel Rainbow Shineline
Amber Letham, @amber_does_mermaid_hair
 Pastel Rainbow ShinelineAmber Letham, @amber_does_mermaid_hair
Step 1. To achieve this beautiful pastel peach/pink and rainbow shineline look, I started out by prepping the hair with K18 Chelator and Mist.
Step 2. After this, I began platinum card foiling my client's hair to lift out the large root we had. I lifted the hair to a level 9 before going back in and bleaching the roots with the goal of achieving a clean level 10 for our pastel tones.
Step 3. Once I had achieved an even level 10, we shampooed the hair before applying a K18 mask.
Step 4. Then, we got to work. I custom mixed a range of pastel rainbow tones using Crazy Color, and we made a horseshoe section at the top of the head.
Step 5. Beneath the horseshoe section, we did a peach into pink melt from roots to ends, then applied film to keep the sections separate.
Step 6. To tackle the rainbow section, I took fine horizonal sections from the back of the head working forward and applied my rainbow shineline starting with my peach root, focusing my pastel rainbow from pink all the way to purple in the midsection of the hair and then ensuring the ends stayed out pastel pink shade.
Step 7. Once we had completed the horseshoe section, I blow-dried, cut and styled the hair. I absolutely love the finished result and think it looks awesome!

