One kit, four new color techniques - Paul Mitchell's latest Color Shift kit was inspired by origami, an art of infinite transformations. Paul Mitchell Professional Hair Color's new Origami Collection presents innovative color techniques designed to spark change for guests in the salon. Co-Owner and Artistic Director for Education Angus Mitchell developed the process for dramatic transformation after reflecting on the craft of origami. Inspired by the beauty an origami artist discovers with a single sheet of paper, Origami Collection similarly offers hairdressers the tool for endless transformations.
“Origami is about working cleanly and precisely: crisp folds, placed just right,” said Angus Mitchell. “The same goes for coloring hair — but it’s not just about sharp lines. If you’ve mastered your craft, even when you use a more organic technique, there is a precision of intention. Origami teaches us this: if you practice your craft with excellence, it rises to the level of an art.”
The Origami Color Shift Kit will be available beginning September 2014. Salons can contact their distributor to purchase.
Origami Collection helps stylists create four dramatically different looks for guests in the salon. Click through to get the formulas and steps you need to recreate each stunning look! [pagebreak]
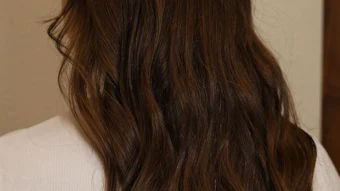
Look 1 by Mary Cuomo
 Formula #1: shines XG® 2 oz. 7OR (7/43) + 3 oz. 10 volume XG Processing Cream
Formula #2: shines XG® 2 oz. 6R (6/4) + 3 oz. 10 volume XG Processing Cream
Formula #3: shines XG® 1 oz. 5VR(5/64) + 1/2 oz. 7PN (7/80) + 21⁄4 oz. 10 volume XG Processing Cream
Sectioning:
1. On the top front hairline, section an off-center triangle using the arch of the eyebrows as a guide.
2. Section from the right front hairline at the parietal ridge diagonally back to meet the top triangle. Continue the parting to the back left ear on the opposite side.
3. On the left side, divide the remaining hair with a diagonal forward section going from the point of the top triangle to behind the ear.
4. On the right side, create a triangular panel just below the top panel at the recession.
Application:
1. Start the application at the base of the nape using formula #2.
2. On a foil, take horizontal sections applying the shines XG® formula #2 from the scalp to the ends.
3. Continue with formula #2 up to the front hairline covering all the hair from the scalp to the ends.
4. Complete the application in the back panel. Overlay with foil.
5. Drop the triangular panel and apply formula #3 from scalp to ends.
6. Slice out a 1/2 inch section parallel to the back panel to the back of the ear. Apply formula #3 and overlay with foil.
7. On the left side, slice out another 1/2 inch section with a diagonal forward section going from the point of the top triangle to in front of the ear.
8. Apply formula #1 on top of the previous foil overlay from the scalp to the ends. Overlay with foil.
9. Release the left side and apply formula #2 from the scalp to the ends. Overlay with foil.
10. Release the top section and retouch the base with formula #2.
11. Next, at the back of the top triangle, part the hair in two sections and place on top of a creased piece of foil.
12. Apply and alternate formula #1 and formula #3 as desired through the two channels from the mid-shaft to the ends.
13. Press the folds of foil together to secure.
14. Continue this same procedure to the front hairline, alternating colors and pressing the folds of the foil to secure.
Processing: 25 minutes
Styling: Shampoo and condition with Color Protect® Post-Color Shampoo and Color Protect® Daily Conditioner or Color Protect® Reconstructive Treatment if necessary. [pagebreak]
Look 2 by Linda Yodice
 Refresh Formula: Paul Mitchell® the color® 1 oz. 9CB + 1 oz. 8CB + 3 shots Violet Color Shots® + 2 oz. 20 volume Cream Developer
Formula #1: shines XG® 1 oz. 10 WB + drop of 8C + 1 1⁄2 oz. 5 volume XG Processing Cream
Formula #2: shines XG® 1 oz. 7NB + 1 1/2 oz. 5 volume XG Processing Cream
Formula #3: SynchroLift® + 20 volume Cream Developer
STEP ONE
1. Section into four standard segments. Clip away for control. Apply the retouch formula onto the new growth. Process for 35 minutes. Shampoo and condition with Color Protect® Post-Color Shampoo and Color Protect® Daily Conditioner or Color Protect® Reconstructive Treatment if necessary.
2. Blow-dry the hair.
STEP TWO
1. Divide the head into four segments, slightly off-center at the front hairline to the center nape, from the crown to the front of each ear. Clip away for control.
2. Start on the front right side taking a vertical diagonal back section that is parallel to the hairline. Slice out the section and underlay with a piece of foil.
3. Divide the hair into two sections. Apply formula #1 to one of the sections of hair, placing the brush at a slight diagonal at the scalp. Feather through all the way to the ends.
4. On the same piece of foil on the second section of hair, apply formula #2.
5. Fold the foil from corner to corner creating a triangular origami foil packet.
6. Slice a diagonal back section and place the hair on a foil. Spray Awapuhi Moisture Mist® in a 1/4 inch ribbon at the scalp to diffuse and soften the formula #3. Next apply formula #3 with the brush at an angle and and feather through areas that need to be lightened.
7. Continue up the segment until you reach the top slice. The top slice should end almost parallel to the center parting and the foil folded square.
8. Move to the opposite side and replicate the same sectioning, color placement and foil fold, alternating colors as desired.
9. Move to the back and starting at the nape using horizontal diagonal back sections alternate the color formulas and apply in the same manner as the front segments.
Processing: 25 minutes
Styling: Shampoo and condition with Color Protect® Post-Color Shampoo and Color Protect® Daily Conditioner or Color Protect® Reconstructive Treatment if necessary. [pagebreak]
Look 3 by Lucie Doughty
 Formula #1: Dual Purpose Lightener + 20 Volume Cream Developer
Formula #2: Dual Purpose Lightener + 30 Volume Cream Developer
Formula #3: shines XG® 1 oz. 9NB + 1 1/2 oz. 5 volume XG Processing Cream
Formula #4a: Peach = iNKWORKS® yellow + Hot Pink + White
Formula #4b: Green = iNKWORKS® yellow + Blue + White
Formula #4c: Purple = iNKWORKS® White + Blue + Purple
Formula #4d: Light Pink = iNKWORKS® Hot Pink + White
STEP ONE, PRE-LIGHTEN:
1. Divide the hair into a “V” shape panel starting at the recession, following the head shape to the center back just below the occipital bone. Repeat on the other side.
2. Above the ear, section out another triangular section connecting to the back of the top “V” section. This is where the Platinum Card technique will begin.
3. Section vertically to just behind the ear.
4. Taking horizontal 1/4 inch sections, apply formula #1, 1/2 inch away from the scalp to the ends on a foil. Fold in half, and lock down each side of the foil to secure.
5. Continue taking the same size sections using formula #1.
6. Move up the head until you reach the top “V” parting. Repeat on the opposite side using formula #1.
7. Move to behind the ear and starting at the bottom nape, use the same Platinum Card technique and apply formula #2.
8. At the center back, start at the bottom nape using the same Platinum Card technique and apply formula #2.
9. The front left side will have a “peek-a-boo” light section. Just below the natural parting remove a section of natural hair that will cover this lightened section.
10. On a piece of foil apply formula #2 and fold into an origami triangle. Continue down the section until you reach the other foils underneath.
Process: Process until a level 9 has been achieved. Shampoo and condition with Color Protect® Post-Color Shampoo and Color Pro-tect® Daily Conditioner or Color Protect® Reconstructive Treatment if necessary.
STEP TWO
1. Starting at the hairline take a vertical diagonal back slice and apply formula #3.
2. Take another vertical diagonal back slice 1/4 inch – 1/2 inch deep. Divide into 3 panels. Apply formulas 4a on one, 4b on another and 4c on the remaining. Overlay the three iNK panels with foil. Repeat the same formulas on the opposite side.
3. On the remaining hair behind the ear, apply formula #3 and overlay with foil. Repeat on the opposite side.
4. Move to the back panel and divide into 3 panels. At the nape apply formula 4d. Above that panel apply formula 4b. Above that panel apply formula 4c and overlay with foil.
5. Move to the front left lightened section and apply formula #3 from the scalp to mid shaft and formula 4d iNK feathered through to the ends.
Process: Process under heat for 15 minutes.
Styling: Rinse, shampoo lightly with Color Protect® Post-Color Shampoo and condition with Color Protect® Post-Color Shampoo and Color Protect® Daily Conditioner or Color Protect® Reconstructive Treatment if necessary. [pagebreak]
Look 4 by Stephanie Kocielski
 Formula #1: Paul Mitchell® the color 1 oz. 4 VR + 1 oz. 10 volume Cream Developer
Formula #2: shines XG® 1 oz. 7RV + 1 oz. 5VR + 3 oz. 10 volume XG Processing Cream
Formula #3: Lighten up® + 10 volume Cream Developer
Formula #4: Paul Mitchell® the color 1 oz. 7OR + 1 oz. 20 volume Cream Developer
Formula #5: Paul Mitchell® the color 1 oz. 6RR + 1 oz. 20 volume Cream Developer
Formula #6: Paul Mitchell® the color 1 oz. 5VR + 1 oz. 20 Volume Cream Developer
Sectioning:
1. Divide the hair from the front hairline recession to the low crown. Repeat on the other side, creating a triangle, and clip away.
2. Take another parting from the recession to the high occipital bone.
3. Part the hair in the center back creating a triangle section on the right side. Clip away.
4. Take another parting from the recession to meet the opposing section at the high occipital and clip away.
STEP ONE
1. Apply formula #1 to the bottom panel starting at the nape. Apply the color from scalp to ends on a piece of foil.
2. Apply formula #2 to the center triangles from scalp to the ends, using a piece of foil to keep the colors separated. Complete the application to both center triangle panels.
3. Apply a “refresh retouch” to the base using formula #1 on the top panel.
4. use a piece of foil as a foundation to apply formula #3 from the edge of the color refresh to the ends and fold the foil to secure.
5. Work from one side to the opposite side taking 1/4 inch to 1/2 inch slices. Apply formula #3 to the mid-shaft and ends. Be sure to go right up to the edge where the color refresh stops.
Process: 35 minutes. Shampoo and condition with Color Protect® Post-Color Shampoo and Color Protect® Daily Conditioner or Color Protect® Reconstructive Treatment if necessary. Dry the hair.
STEP TWO
1. Divide the hair into a triangle on top using the recession and high occipital as the guide. Clip away the sides and the back.
2. Make 7 narrow triangles inside the top triangle panel and clip away.
3. Start the application on the front right side. Divide each narrow triangle in half, creating a front and a back panel. Apply formula #6 to the lightened hair, making sure you completely saturate each section.
4. Fold the foil from corner to corner and then in half to create a triangle origami foil. Leave the other half of the narrow triangle section clipped away.
5. Move to the next narrow triangle section, repeat the process, but apply formula #5 on the lightened hair. Keep the other part of the narrow triangle clipped away. Move to the next section and apply formula #6. The complete foil rotation from left to right is formula #6/ #5/ #6/ #5/ #4/ #5/ #4. Repeat this color rotation on the remaining clipped sections from right to left using formula #4/ #5/ #4/ #5/ #6/ #5/ #6. use 3 different colors of foil to track the rotations of each section.
Process: 35 minutes.
Styling: Shampoo and condition with Color Protect® Post-Color Shampoo and Color Protect® Daily Conditioner or Color Protect® Reconstructive Treatment if necessary.