Dark Curiosity
 Nethan Nguyen
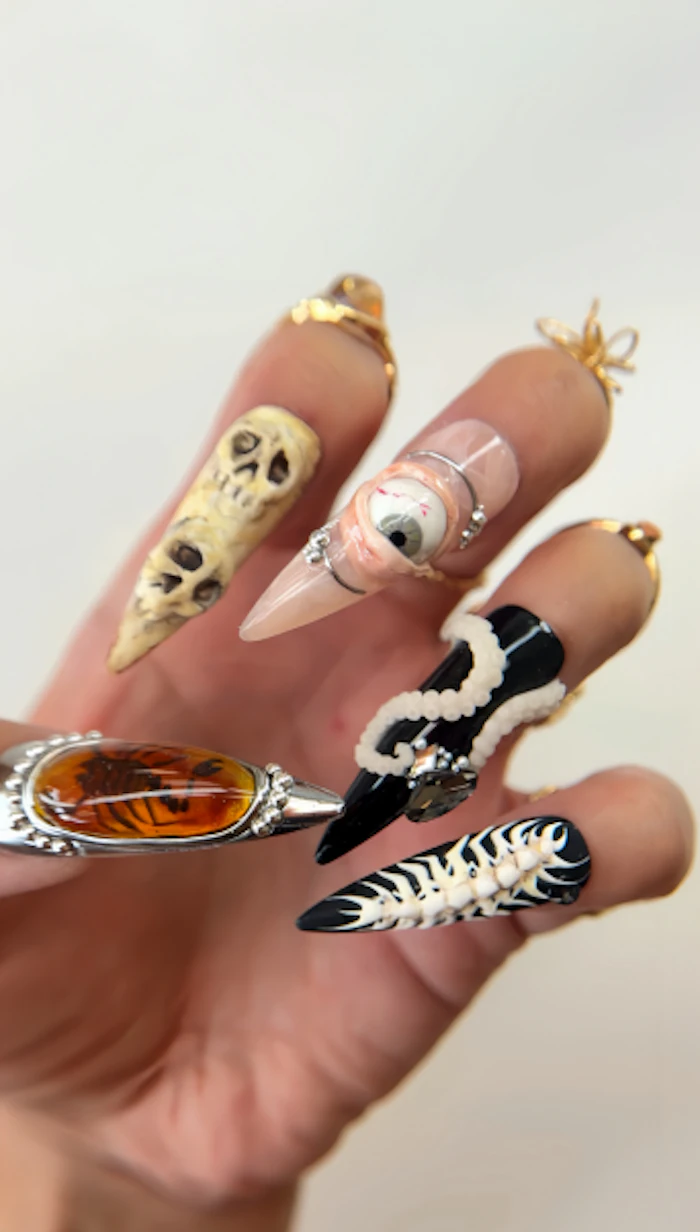
An intricate nail set inspired by antique cabinets of curiosities, preserved specimens, and the beauty of natural decay transforms the darker side of anatomy into wearable nail art. Each nail represents a different found object—a scorpion suspended in amber, weathered skulls, glowing octopus tentacles, a surreal 3D eyeball, and an exposed spine. The contrast of glossy black, aged ivory, translucent amber, neutral skin tones, chrome, and sculpted textures creates a mysterious collection that feels both macabre and luxurious.
Thumb: Scorpion in Amber
 Nethan Nguyen
Use black no-wipe gel to outline an elongated oval, leaving the center clear. Cure, then rub silver chrome powder onto the black gel. Trace the oval with black embossing gel to create a raised frame. Cure, then apply silver chrome powder to the frame.
Paint the scorpion inside the oval using black gel and cure. Layer orange and brown jelly gels over the design to create a rich, translucent amber effect, curing between layers.
Build a smooth dome over the amber using clear 3D no-wipe gel for a dimensional, glasslike finish. Cure, then complete the frame with silver bead accents.
Index: Timeworn Skulls
 Nethan Nguyen
Apply white gel polish for an even base and cure. Use white solid builder gel to sculpt two raised skulls. With a silicone tool, carve the eye sockets, nose cavities, and teeth, then cure.
Dab earthy, sand-toned color across the skulls and surrounding surface, creating a mottled, aged-bone effect, then cure.
Use black and brown gel to deepen the eye sockets, nose cavities, and spaces between the teeth for a weathered, decayed look. Cure, then finish with a matte top coat and cure again.
Middle: Glowing Octopus Tentacles
 Nethan Nguyen
Apply black gel polish and cure. Finish with a glossy top coat and cure again.
Mix clear solid builder gel with glow-in-the-dark powder. Roll the mixture on paper into long, tapered tentacles, then arrange them in curves on the nail. Add suction-cup details and cure.
Apply a matte gel top coat to the tentacles, keeping the black background glossy. Cure.
Arrange jewels and pearls around the tentacles, securing each embellishment with gem gel. Cure to complete the design.
Ring: 3D Eyeball
 Nethan Nguyen
Apply a matte gel top coat and cure. Add white nail art ink to create soft, flowing lines, then let the ink dry.
Apply a sheer neutral gel color over the white detailing and cure.
Drill a circular opening in the detached nail tip, sizing it to fit the eyeball.
Cover a small magnet with white builder gel to form the eyeball and cure. Paint the iris, pupil, and fine red veins, then cure.
Seal with a glossy top coat and cure again. Position the eyeball in the opening. Sculpt upper and lower eyelids around it with builder gel and cure.
Decorate with silver accents, then finish with top coat and cure.
Pinky: Sculpted Spine
 Nethan Nguyen
Apply black gel polish for an even base and cure.
Create the spine design in white gel, extending curved, tapered points along both sides. Cure, then lightly dab earth-toned gel over the design for an aged-bone effect and cure again.
Add raised, rounded dots down the center to form the vertebrae and cure. Dab a little earth-toned gel around each segment to add depth, then cure. Finish with top coat and cure.