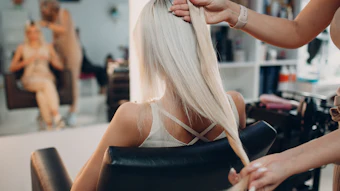
Jet, a stylist at New York-based Anthony DeFranco Salon and Spa, recently created this intricate, yet surprisingly simple, braided bun up-do for a client. The versatile style works for guests on their way to a formal holiday party, a casual brunch with friends, or simply running errands around town. See the steps to recreate this fun look, below!
Get the Look:
1. To begin, determine where on the crown the bun will be sitting. Then divide the hair from ear to ear, making two big sections. Tie the front sections out of the way.
2. Brush the hair from the bottom section smooth using a pea size amount of L’Oreal Lumi Control (to add shine and tame fly-aways). Tip: Ask client to place their head down towards theirs knees.
3. Begin Dutch braiding the bottom sections. Tip: Continue the Dutch braid all the way to the end then tie off. Doing this allows you to join it with the front section without unraveling your braid.
4. Have client raise their head back up. Brush the hair from the front section smooth. Once smooth add the tail end of the braid into the bundle of hair and tie into a ponytail at the crown. Use L’Oreal Infinium 4 to smooth and set the front section.
5. Undo the tail end of the braid. Tip: Iron out any ripples that may have set from the braid.
6. Separate a 1-inch section of hair from the bottom part of the ponytail; pull the ponytail through a donut making sure the 1in section of hair lays under the donut. Secure donut in place with pins.
7. Take hair from ponytail and fan it out to cover the donut. Now, take the small section sitting underneath the donut and begin a 3-stranded braid, left strand crossing over middle, right strand crossing over left. Now take a ¼-inch section of hair from the hair that is laying over the donut, add it to the left strand of the braid and cross over the middle. Then take the right strand and cross over the left strand. Continue adding ¼-inch sections to the left strand of the braid only. As you braid, move along with the braid so it comes out tight and smooth.
8. Once you have finished adding all the hair, continue the braid all the way to the end and secure it with a small elastic.
9. Take the tail portion and coil and tuck under the braid. Secure base and braid with bobby pins and finish with hair spray.
Check out the video below to see the steps in action!
[Image: Instagram.com/adfsalon; Video courtesy of Anthony DeFranco Salon and Spa]