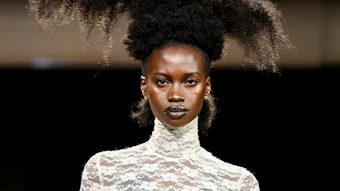
The Monique Lhuillier Fall 2014 Bridal Collection featured an array of romantic undos and intricately braided hairstyles. According to Monique Lhuillier, the inspiration for the collection was drawn from the idea of a "secret garden," and aimed to "celebrate romance with an heirloom quality." The collection strongly emphasized "femininity and sensuality," with the use of "tulle and an array of signature lace details. Embroideries [were] delicate in floral, lattice and vine motifs, colored in antique silver and rose-gold thread work."
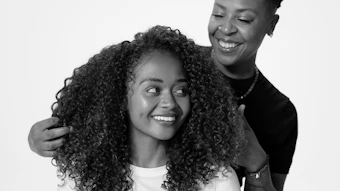
To further enhance this feeling of romantic sensuality, runway stylist and Moroccanoil Artistic Director, Antonio Corral Calero garnered inspiration from the timeless beauty and poetry of the secret garden. With the use of Morrocanoil products, he created six different variations of braided looks that were simultaneously elegant, feminine and intriguingly modern. According to Corral Calero, "We wanted the girls to look like themselves, wearing updos with a romantic, soft, and whimsical mood. The attention was on the matte texture of the hair and the intricate details of each braided bun, parted side or center, with minimal volume on top."
How the Looks Were Created:
Foundation:
Corral Calero explains, “First, I applied Moroccanoil Treatment from mid-length to ends. Then, I sprayed new Root Boost throughout the entire head and began blow-drying while using my fingers to lift, detangle and separate strands. To help detangle the hair while blow-drying I used a Moroccanoil Classic Boar Bristle Brush. Once I made sure that the hair was entirely dry, I applied new Moroccanoil Molding Cream to provide additional texture, especially at the crown.”
First Look:
 Step 1: “To begin, I combed all the hair towards the back of the head.
Step 2: "I then created three large parts: right, left and back.”
Step 3: “Each of the three parts became a braid. The right and left sides were inward French braids and the back braid between them was a standard braid, which would serve as the base for the chignon.”
Step 4: “I pulled the left and right braids around the back of the head and then wrapped them several times around the back braid. They wrapped about halfway down the back braid.”
Step 5: “I pinned the bottom part of the braid inwards, towards the nape, and created the chignon.”
Step 6: “To give the chignon a more romantic and uneven look, I gently pulled and opened elements of each braid slightly within the chignon.”

(Click through to see the remaning looks) [pagebreak]
Second Look: Step 1: "First, I parted the hair to the side."
Step 2: "Next, I divided the hair into three parts: right, left and back."
Step 3: "Each of the three parts became a braid. The right and left sides were inward French braids and the back braid between them was a standard braid, which would serve as the base for the chignon."
Step 4: "I pulled the left and right braids around the back of the head and then wrapped them several times around the back braid. They wrapped about halfway down the back braid."
Step 5: "I pinned the bottom part of the braid inwards, towards the nape, and created the chignon."
Step 6: "To give the chignon a more romantic and uneven look, I gently pulled and opened elements of each braid slightly within the chignon." [pagebreak]
Third Look: Step 1: "For this look, I combed all of the model’s hair towards the back and used Moroccanoil Luminous Hair Spray Medium to help control and eliminate fly-aways close to her face. Moroccanoil Luminous Hair Spray Medium is the perfect tool for this look: it gives the right amount of hold to keep the hair in place, and leaves it looking beautiful with natural shine."
Step 2: "Next, I divided the hair into three parts: right, left and back."
Step 3: "Each of the three parts became a braid. All were standard braids, which would serve as the base for the chignon."
Step 4: "I crossed the right braid with the left towards the back of her head, and clipped it into place."
Step 5: "Then, I took the back braid and twisted it towards the outside, rolling it towards the crown. I used clips on all three braids at the bottom of the chignon, to hide the ends."
Step 6: "As a final step, to give the chignon a less tight, more romantic and slightly uneven look, I gently pulled and opened elements of each braid slightly within the chignon." [pagebreak]
Fourth Look: Step 1: "For the fourth look, I combed all the hair towards the back of the head and used Moroccanoil Luminous Hair Spray Medium to help control and eliminate fly-aways close to her face."
Step 2: "Next, I divided the hair into three parts: right, left and back."
Step 3: "Each of the three parts became a braid. The right and left were lace braids. The back (middle) braid was a standard braid, which would serve as the base for the chignon."
Step 4: "I pulled the left and right braids around the back of the head and then wrapped them several times around the back braid. They wrapped about halfway down the back braid."
Step 5: "I pinned the bottom part of the braid inwards, towards the nape, and created the chignon."
Step 6: "To give the chignon a less tight, more romantic and slightly uneven look, I gently pulled and opened elements of each braid slightly within the chignon." [pagebreak]
Fifth Look: Step 1: "I began by parting the model’s hair to the side."
Step 2: "Then, I divided her hair into three parts: right, left and back."
Step 3: "I created two braids: one on the right and another on the left. One was a regular braid, and the other a French braid."
Step 4: "The back (middle) part was turned into a ponytail, which I back-combed slightly."
Step 5: "The right braid was crossed with the left, towards the back in a circular motion around the back braid until mid-ponytail."
Step 6: "Next, I pinned the bottom part of the braid inwards, towards the nape to create the chignon."
Step 7: "As a final step, to give the chignon a less tight, more romantic look, I gently pulled and opened elements of each braid within the chignon." [pagebreak]
Sixth Look: Step 1: "To create the final look I began by combing all of the model’s hair towards the back of her head. I used Moroccanoil Luminous Hairspray Medium to control any fly-aways close to her face."
Step 2: "Next, I divided her hair into three parts: right, left and back."
Step 3: "The right and left parts were turned into feather braids. The back (middle) part was turned into a slightly back-combed ponytail."
Step 4: "I then crossed the right braid with the left towards the back of the head, circling the back part until mid-ponytail."
Step 5: "Next, the bottom part of the braid and ponytail were pinned inwards towards the nape to create the chignon."
Step 6: "As a final step, to give the chignon a less tight, more romantic look, I gently pulled and opened elements of each braid within the chignon."[All images courtesy of AH PR Group]