In the highly competitive world of lashing, knowing how to snap a photo of your work can be absolutely priceless.
Gaining business through social media takes more than just a spectacularly mapped lash; it also takes an eye for photography. With the right lighting and correct angles, a perfectly framed lash extensions photo catches the eye of prospective clients and lets them snag a glimpse of your artistry. “Almost everyone has a digital presence, and one of the first places [clients] go for information is social media and review sites,” says Veronica Rich, London Lash master trainer and owner of Rich Lashes Atelier in East London, United Kingdom. Agrees Lia Juhas, master lash artist and trainer in Mississauga, Ontario, Canada, “Social media plays such a big role in our community; you need an online portfolio to win over clients ... Clients want to see proof of how good you are.”
Not to mention, your imagery will help to grow your brand. “Social media completely built my business, and if it weren’t for my photos, I believe I wouldn’t have had the success I’ve had,” attests Christina Ballstaedt, founder of Eyelashtina in Las Vegas. She divulges that she’s built her clientele almost exclusively from Instagram, where she boasts more than 20,500 followers.
In addition to grabbing consumer attention through smart images, the right photos can help you network, land jobs with brands and be inspired by other lash artists’ feeds. “It’s a way of journaling our stories and progress but, most importantly, we’re creating connections with our peers,” says Ballstaedt. That sense of community, according to Natalie McCarty, NovaLash global brand ambassador and lash artist at Ultra Performance Hair & Nail in Monroe, Michigan, allows artists to “help one another succeed.” The icing on the cake: Your social media feed can bring lash companies to your virtual doorstep. “Posting pictures gets companies to notice you, creating new job opportunities,” says Juhas, who shares she’s been approached by multimillion-dollar beauty companies thanks to her Instagram feed and its 30,600-plus followers.
RELATED: Yelp Marketing 101 for Salon Owners
So pick up your smartphone or digital camera: Our lash pros’ tips will have you packing your social media feeds with the perfect business-building shots.

Angles
Photo angles also make or break the image. “Find angles that are complementary to the client’s face and avoid angles that cause facial distortion; after all, no one wants her nose looking like Mount Everest!” Ballstaedt laughs.
After completing one eye, NovaLash brand ambassador Lauren Frances Lord of Nu Dreams in Alfaz del Pi, Alicante, Spain, likes to take a direct, dead-on approach: “Have the client look straight into your camera, with [one eye] lashed and the other bare. This really shows potential clients what a difference wearing lashes makes,” she says.
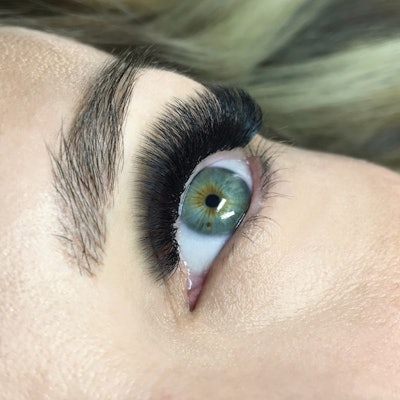
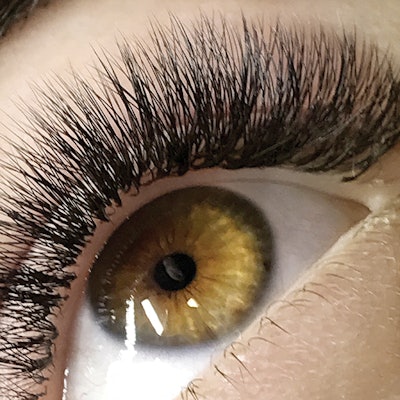
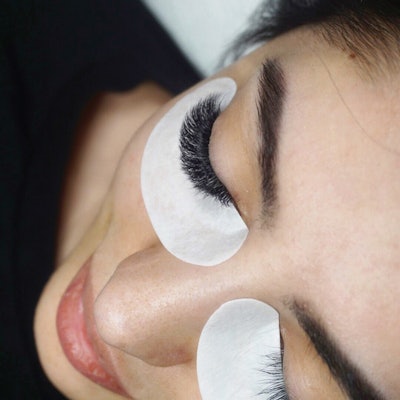
For macro (meaning, up close) shots, Juhas recommends shooting one eye only to allow for a zoomed-in photo with more details. Most close-up shots can be best executed while the client lies down. If you desire a closed-eye shot, she suggests positioning yourself behind the client’s head and taking a picture downward from the side. “This is a very pretty angle and the client’s nose doesn’t stand out as much as it would standing directly behind them,” Juhas says. Fotini Filini, NovaLash global brand ambassador and owner of Lashes by Fotini in Deerfield, Illinois, uses this angle for both “before” and “after” pictures. “I can see the shape and layout of the lash style and how different it looks from the ‘before’ photo,” she says.
RELATED: Beauty Marketing Pros on Optimizing Social Media Hashtags
For open-eye macro shots (a lash pro favorite), direct clients to look up slightly; this angle shows off “the cleanliness of the lash isolation and coverage,” Juhas adds.
When in doubt, take multiple pictures from all angles, suggests Juhas. Her reasoning: You’ll likely find a few angles that show off your work best for that particular client. “Different angles can also indicate that your work looks good no matter what angle you look at it,” she reasons.
Lighting
Natural lighting ranks high for lash artists, thanks to easy mobility of clients in the light source and sunlight showing off a client’s eye color. “I like to start all full sets at 9 a.m. to ensure I’ll be able to capture a finished look in the perfect light and avoid harsh shadows from the direct sun,” says NovaLash 2015 Lash Artist of the Year Bianca Martinez of Lashes By Bianca in Yuma, Arizona.
RELATED: Photo-Sharing Best Practices for Lash Artists
When manmade lighting is in order, lash pros turn to LED lighting. Ballstaedt opts for two easily adjustable Glamcor LED lights, which she places on both sides of the client, reasoning, “You want enough lighting so that it’s evenly distributed across the client’s face.” Rich prefers Glamcor as well, but uses a mini ring light that clips onto her smartphone (NovaLash offers the fLASHlight) to elicit a crisp lighting effect that translates well for pictures. “I like ring lights because they put a lovely little circle of light in clients’ irises that looks cool in photos!” she thrills.
Distance
When it comes to how far you should hold your camera or smartphone from your client’s face, artist preference varies. The end goal: achieving focus. “At least 10 inches away to keep the focus nice and not blurry,” explains Lord. Martinez goes in even closer: “Don’t be shy to get up close and personal. When shooting with your smartphone you have to be within 3 to 4 inches to get a great close-up of lashes,” she says, noting that digital cameras allow greater distance between you and your subject if that’s preferred. If clients balk at this forced intimacy, Juhas says, “Explain why it’s required, as one quality picture can gain you five potential clients!” Worried about framing? Leave nothing to chance. “Take pictures from different distances and go back to see what can be cropped in or edited to create the ‘perfect’ picture. It’s better to have more in the picture and crop in before posting than wishing you had more,” McCarty explains.
Editing
Naturally, you want your image to look gorgeous, which may require some photo-editing manipulation. That doesn’t mean you should use photo-editing apps to overhaul your lash job; after all, you want to project an honest portrayal of your work. But simple cleanup (think: pimples or red eyes) and overall image brightening are perfectly acceptable.
In fact, if a client’s eyes are red and teary, wait 10 minutes post service to shoot any photos. Though photo apps allow you to color-correct redness, Martinez notes that clients who suffer from red eyes may feel standoffish about being photographed. Juhas warns that posting lash shots with red eyes could lead to online criticism—even though you know your stuff. “As lash artists, we realize red eyes are likely due to slight irritation from the fumes or gel pads and that they’ll go away [quickly]. But to potential clients, this could indicate you’re unskilled,” she says.
Should you forego the shot? Not so fast: Rich typically still shoots clients with red eyes who give permission, but uses the shots as educational posts. “I wouldn’t necessarily post it as a typical lash shot, but more as a ‘tip’ post, suggesting ways other lash artists can avoid red eyes,” she explains.
Video
Think your social media should only be static photos? Think again: “Videos will capture your work better when you can’t find the right photo angle for that particular client,” says Martinez. Her advice: Get creative using slow-motion videos to transition to the final look. Agrees Filini, who asks her clients to blink during taping, “something about seeing how the eye opens and shuts slowly with all those Volume lashes really gets me. I love it!”
Or, try an app like Boomerang that shoots 15-second looping mini-videos. “These are so fun for social media stories on Snapchat and Instagram,” says Martinez.
By the way: Don’t forget your angles with videos. “One of my favorite angles to shoot is a top view, but it works even better as a video of you brushing through the lashes with a spoolie. This really captures the overall shape of the lash look,” says Rich.
Photos, videos, Boomerangs: Master them all. “If you don’t post your work and advertise [your skills], no matter how good you are in your trade, you’ll struggle to grow your business,” Juhas says.
