Daryna Barykina, an award-winning photographer, makeup artist, model and educator, shares her photography tips to improve your Instagram page.
Chances are, no one told you when you were starting out as a hairstylist that in order to be successful in today’s world you’d also need to be an accomplished photographer. Before you panic and sign up for a MasterClass with Annie Leibovitz, however, we have a better idea: Read this article, packed with valuable advice from photographer, makeup artist, educator and model Daryna Barykina, and share it with your friends and fellow stylists. Barykina has spent nearly a decade shooting in the beauty space, and offers classes as well as in-salon sessions. Here, she answers our questions about how to shoot captivating photographs for Instagram.

Composition is very important—not just for Instagram, but for photography in general. Composition is the No. 1 tool in photography that creates an “experience” for the audience. It’s the main storytelling mechanism that helps engage the audience and can make a static image appear dynamic. Instagram is a visually driven platform—the audience sees the image before they read your caption. This is why it’s necessary to be smart about your photography and effectively capture your audience’s attention. It’s also a way of showing respect to your audience—show up in their feed with a beautiful, captivating, polished photo that’s worthy of their attention.
Do you need to invest in a good camera, or will a smartphone work? And is there a difference between the camera quality on different phones?
I’m a strong believer in getting the best out of what you already have before upgrading to more advanced equipment. If you’re using a smartphone, use it to the best of its ability. Make sure you really enjoy the photos you’re taking with your phone. You can create a gorgeous photo anywhere, at any time. Using a more advanced device often comes with frustration, and this is when many of us start to give up. You have to learn a lot of new features and will mess up quite a bit before getting it right. This is why it’s important to understand that you already have the ability to capture beautiful images. On the other hand, a camera takes better photos simply because that’s what it’s made for. Once you feel you’ve gotten as far as you can with your phone, then it’s time to upgrade your equipment.
There’s definitely a difference between smartphone cameras and how they capture images. I find the iPhone to be a bit more intuitive for the beginner. There’s one smartphone photography hack I want to share: The potential of your smartphone’s camera is far greater than the built-in app allows. For bigger file size, shooting raw and custom exposure/white balance features, shoot using the Lightroom app by Adobe. It’s free and can serve as a perfect transition between the smartphone and a camera.

For someone who’s just starting to learn, I would suggest shooting in daylight. Always shoot in indirect sunlight, whether it’s outside of the salon or inside using window light. Use a reflector to get rid of any shadows. One time I was traveling for a class and my bag got lost. My reflector was in it, and I had to come up with a solution on the spot. I took a piece of cardboard and taped Framar foils to it. This little DIY reflector worked wonders, and the audience loved seeing how you can think outside the box and work with what you have.
I personally prefer a controlled lighting environment where I can manage character, quality and direction of light. This is why I recommend exploring artificial lighting sources like ring lights, LED and fluorescent softboxes, LED discs, etc. By getting comfortable with continuous light sources, you will be able to identify lighting mistakes (such as color casts or yellow, blue or green tones in the photo) and eliminate them, which would be impossible working with daylight and ever-changing weather conditions.

There are so many elements to a shot: model, background, wardrobe, pose, lighting, camera and composition. All of these elements are important, but how can you get a grip on all of them at once? My best advice is to create a “comfort zone,” then work toward building a more predictable setup. Identify an area you’re most comfortable with and then fix other aspects one by one. This approach will make the photo shoot process manageable and less stressful. For example, you may be very proficient shooting in daylight and able to get your colors right. Therefore, lighting is not a concern, so you can focus on another element, such as the background. In this example, let’s say you have been shooting against the salon window, which reflects a parking lot or has a big advertising banner. What can you do to improve the background? Go to a craft store and buy a foam core board that you can attach to the window to serve as a backdrop, or buy a vinyl backdrop on Amazon that can roll up and be stored in your locker. Once the background issue is fixed and you’re comfortable, then think of the wardrobe. Have a few neutral-colored jackets or shirts on hand for your client to put on when you’re taking her photo. Later on, focus on composition and making poses more interesting, adding accessories, and so on.
Is it OK to use filters?
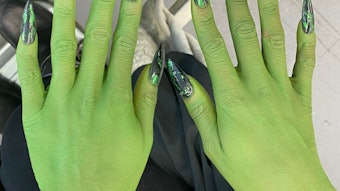
Before saying yes or no, I would ask a stylist why she wants to use a filter. Is there something in the photo she’s unhappy with and would like to correct? If so, can it be fixed at the time of shooting? Most of the time, issues can be fixed “in camera” at the time of shooting, rather than in editing. This is always best, not only because of the outcome, but also in the interest of time. But there are situations, such as the camera’s limitations (old smartphone model), or circumstances of the photo shoot (unfixable lighting situation), when you have no other choice but to rely on editing and retouching apps. Here I always recommend being honest. Fix the image without changing the look of your work (color tone, haircut shape, precision, etc). If a filter is an element of your personal style and hair color doesn’t matter—for example, you’re an upstyling artist—then you can go nuts with color filters. Some bridal stylists have the dreamiest-looking pages, like Ulyana Aster. She plays with contrast and adds very light color toning, as well as a good dash of grain, for a vintage fairytale look. But whatever you do, stay classy! Less is more.

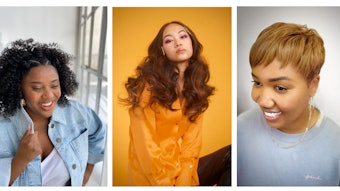
I would recommend posing based on where the most interesting elements of the hairstyle have been placed. If they’re around the face, then show that off by facing your client toward the camera or photographing a three-quarter portrait. If you’re trying to show a color correction and the most work was performed at the back, then photograph from that angle. If it’s a haircut, choose an angle that shows it off the best. I personally like seeing just a bit of a person’s face. Also, why settle for just one photo? Take a few at different angles and post them as an Instagram album or spread them out over time.
To get a model or client to relax, talk to her while you’re shooting so that she stays focused on the conversation and is distracted from the camera. An attendee from one of my classes suggested asking a client a funny question, such as “Who’s your favorite child or grandchild?” This question instantly makes people smile, because there is no favorite (...or is there?). You know your clients well enough to pick a question that would make them giggle. I also use a little mantra to help get the posture right: “Shoulders back. Chest out. Booty out.” This helps elongate the neck, make the tummy flatter and even changes facial expression.

This is difficult to achieve even for professional photographers. It demands a lot of technical knowledge about lighting and how the camera “sees” and processes it. On the bright side, a few practical things can be done to help the camera show proper color.
Tip #1: Turn off any extra light outside of your main light source. If you’re working indoors with natural daylight, see to it that there are no other lights above your client or take her outside to eliminate extra light affecting your scene.
Tip #2: Make sure all lights are the same color temperature. Each type of lighting—fluorescent, incandescent, LED, daylight—has a different color temperature. That is, some are warmer, and some are cooler. When warm and cool lights get mixed, cameras show either a yellow or blue color cast—this happens especially with smartphones. When all light is the same color temperature, the camera can more easily identify it and can better neutralize or cancel out the color cast, capturing true-to-tone color. In your shooting area, match the color temperature of the overhead lights to your ring light or softbox to help the camera deal with undesired color casts.
Tip #3: If turning off salon lights or changing bulbs in the salon isn’t an option, consider getting a light source with adjustable color temperature, which has a dial to make the light appear warmer or cooler. Match the color temperature of your source to the existing ambient light. This will even out an overall color temperature in the scene and will help your camera identify the color cast and neutralize it.
Tip #4: Camera users, employ all of the above, but also use a white balance card to program your camera to your unique lighting environment for even better color capture.
Want to learn more from Barykina? Follow her on Instagram, where she announces her quarterly classes. You can also check out her website at darynabarykina.com—she’s launching an online education program later this year.
[Images: Courtesy of Daryna Barykina]
This story first appeared in the January issue of Beauty Launchpad. To receive the magazine, click here to subscribe.