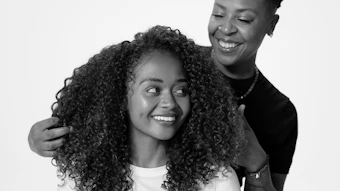
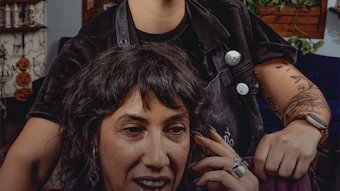
Good day, sunshine! Deborah Gavin, International Artistic Director, Keratin Complex Color Therapy, created this delicately beautiful, lemony hue in her latest coloring technique, "Lemon Sunshine." "The fontal slices will have the most lemon influence, with less diffusion of color as you move toward the crown," she says. "Be sure to stop the lightening process a bit above the target level. In this case, the target was a level 10, so we lightened a bit beyond a level 10 to ensure proper deposit."
Read on for the step-by-step to create this hue for your own clients!
[[Image: Babak; courtesy of Keratin Complex]]
[pagebreak]
 Existing Levels: 6 at new growth (to 1 inch from scalp)
9 at mid-lenths to end
Target level: 10
 Before
FORMULA:
Formula A (lightener):
30 mL/1 fl. oz. It's a Blonde Thing Keratin Lightening System powder
60 mL/2fl. oz. 20 vol. It's a Blonde Thing Developer
Fomula B (overlay):
30 mL/1 fl. oz. 10.28/10 VP (Ultra-Light Violet Peral Blonde)
60 mL/2 fl. oz. 20 vol KeraHold Developer
Formula C (lemon highlights):
15 mL/.5 fl. oz. 10.3/10G (Ultra-Light Violet Pearl Blonde)
10 mL/.33 fl. oz. 9.43/9CG (Lightest Copper Gold Blonde)
5 mL/.25 fl. oz. .33/GG (Extreme Gold)
30 mL/1 fl. oz. 20 vol. KeraHold Developer
[pagebreak]
 Step 1: using a compact foil technique, apply Formula A from scalp to line of demarcation .
Step 2: Process until proper target level is achieved, then cleanse hair with Keratin Complex Keratin Color Care Shampoo.
Step 3: Apply Formula B to the warmest areas first, followed by the other areas. If the canvas is even after it is cleansed, apply Formula B all over. Process 10 minutes. Cleanse hair with Keratin Complex Keratin Color Care Shampoo.
 Step 4: Working on the hearvier fall of the natural part line, create a triangle, with the part as the base, by starting at the crown and drawing a line tot he outer corner of the eye. Create as similar triangle on the other side that begins at the same point and ends between the center forehead and mid-brow. Using the point of this asymmetrial triangle as a guide, carve out another smaller triangle shape behind it, encompassing the crown.
 Step 5: Staying within the asymmetrical triangle, apply Formula C in slices from the forehead to the top. Cover the forehead supsections with the most amount of color by painting from the scalp to 1/4 inch from ends, finishing off the ends with an angled brush in varying degrees to softly blend into the beige blonde. Continue working through subsections as you move up the crown, saturating less of the length of the hair as you move upward, and fiffusing through the ends. The subsections at the crown should be painted with formula from scalp to midshaft, but still blended with the feathering and angling of brush.
 Step 6: Using Formula C, repeat the same technique on the smaller triangle section at the crown. The subsections closest to the crown should be most saturated with color. Process for 35 minutes.