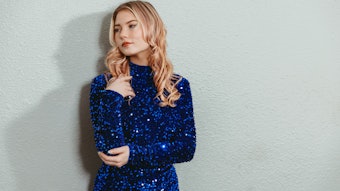
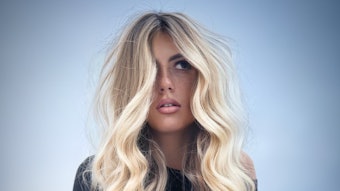
@Guy_Tang #mydentity global artist (@guytang_mydentity), recommends always capturing an ultra-clear image. “Use a white background,” says Pham. “Make sure the model or client is wearing either simple, black or white clothing. Also, make sure the hair is smooth, polished and has no flyaways." Pay attention to lighting too, says Pham. "The right lighting is very important for your IG photos. In most cases natural light is best, but in my photos featured here, I used an LED ring light.” Here, Pham dishes on how she achieved both the color and style for this well-liked ’do.
COLOR FORMULA & TECHNIQUE
@Guy_Tang #mydentity Hybrid Lightener with #Big9 + #Magnum8 + 20-vol. Developer (1:2)
Rootagé: 55g. @Guy_Tang #mydentity Demi 8SS Silver Smoke + 5g. Eclipse Xpress Toner + 6-vol. Developer (1:2)
Mids: 55g. Demi 8SS Silver Smoke + 55g. Misty Mauve Xpress Toner + 6-vol. Developer (1:2)
Ends: Demi 55g. 10SS Silver Smoke + 55g. Misty Mauve Xpress Toner + 6-vol. 1:2 (Process for 25 minutes.)
Step 1: Using the backcomb technique, lift the hair until you reach a level 9. (Note: Start backcombing at the nape. Then, tease hair halfway up, making sure not to get too close to the scalp until you reach the occipital bone. Flat-foil hair, then proceed to tease up toward the scalp.)
Step 2: Pre-tone hair with the @Guy_Tang #mydentity Xpress Toner Misty Mauve + 6-vol. Developer (1:2) on damp hair for five minutes.
Step 3: Apply the formulas according to preference.
Step 4: Shampoo and condition the hair with
@Guy_Tang #mydentity #MyConfidant Shampoo and Conditioner. The duo works to prolong color tone.
Step 5: Dry hair, then style as desired.

Step 1: Blow-out hair smooth with a large round brush.
Step 2: Using a 1½-inch curling iron, take ½-inch sections on the diagonal, starting in the back and working toward the front.
Step 3: Set the curling iron at 350° F and style. Then, let hair cool for five minutes.
Step 4: Spray @Guy_Tang #mydentity #MyStardust Shine Spray over the entire head to smooth and polish waves while taming flyaways. (Note: This makes the haircolor brighter and richer in photos.)
Step 5: Spray @Guy_Tang #mydentity #MyControl Hairspray to nix flyaways while capturing your images.
Step 6: Brush out curls with a soft boar-bristle brush.
Step 7: Layer on more @Guy_Tang #mydentity #MyControl Hairspray while smoothing curls.

Step 1: Use @Guy_Tang #mydentity #MyHairLube on towel-dried hair before and after blow-drying.
Step 2: Take a 1-inch section of hair from each side of the temple, then pull the sections back into the center of the head and tie a knot.
Step 3: Spritz @Guy_Tang #mydentity #MyControl Hairspray to tame flyaways.
Step 4: Layer on @Guy_Tang #mydentity #MyStardust Shine Spray for major shine sans added weight, along with @Guy_Tang #mydentity #MyControl Hairspray for flexible hold.
Disclaimer:
The above paid-for content was produced by and posted on behalf of the Sponsor. Content provided is generated solely by the Sponsor or its affiliates, and it is the Sponsor’s responsibility for the accuracy, completeness and validity of all information included. Beauty Launchpad takes steps to ensure that you will not confuse sponsored content with content produced by Beauty Launchpad and governed by its editorial policy.