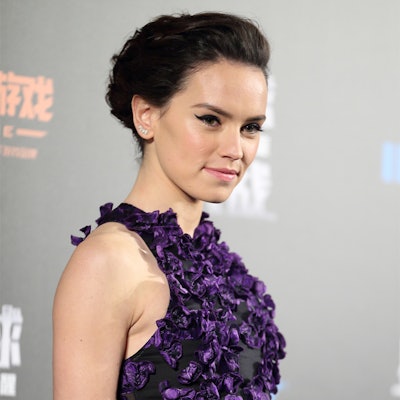
Actress Daisy Ridley recently walked the red carpet at the Shanghai, China premiere of Star Wars: The Force Awakens looking stunning in an embellished Jason Wu gown and sweeping, romantic updo. Celebrity stylist Robert Vetica, owner of the Robert Vetica Salon inside the SLS Hotel in Beverly Hills, CA, described his inspiration for the style as "Goth Romance." The youthful yet regal style is, according to Robert, "…moody, it's sexy, it’s feminine but not fussy - there's elements to it that are almost Victorian. There's something very confident about it; quintessentially 'woman.'"
Robert described his process in creating this look, stating, "I have a ton of vintage references that I'm constantly combing through and collecting, and typically with each client I just have a vision for them after meeting them and working with them for a while - I get a certain vibe, and with Daisy I've always had this feeling about 'freshness' and youth, and having fun. With red carpet though, you have to collaborate, you have to communicate about what each person wants and is doing, and I think we all have the same idea about what we want to bring out. Again, it's that freshness, that newness, and a really positive attitude. The essence of that is the ability to switch it up, and not be repetitive in your looks, but still sticking with the same feeling. This look was still very 'modern muse,' but the hair itself was a little more shaped and more polished… but still very glamorous."
Get the Look:
Says Robert, "For [this look] on Daisy, I used a curling iron because I feel it allows the look to appear more modern, a little bit softer. I also have more control when I’m the one handling the iron as opposed to having each strand of hair be the exact same size and then walking away while the rollers form to the hair. It's nice to be able to control the heat as well as the size and position of the curl to really customize it.
- "For a long-lasting style, I spritzed Joico's FLIP TURN VOLUMIZING SPRAY from roots to tips before beginning anything else. It smells amazing – kind of like vanilla. I don't like 'helmety' hair, or anything that makes it stiff and unrealistic, and what I really liked about this product is that it had movement! I felt like this product was like a volumizer, a hairspray and a thermal protectant, all in one – amazing. But we really did flip her hair over and spray - love how literal the product name is!
- "I then began blow-drying her hair for a little bit of volume as it was already pretty voluminous after we distributed the product. For me, it's all about getting underneath each section of hair if you're blowing it out for volume purposes, and then lifting it up and away from the head. TIP: If you want more volume from your hair, never flatten it by drawing the hair brush over the surface of the hair. Rather, insert the brush into the underside of each section and direct the airflow from the hair dryer from above whilst continuously lifting it up and away.
- "We then had her flip her head and focused on the roots for about 10 minutes on a low to almost no-heat setting. As the hair got more shape and body, we then put in Joico's HAIR SHAKE for just a little added texture and volume. You really don't want the hair to fall flat in this look, and the more products you use like this the better, because the hair WILL fall later on. This spray is almost like a salt spray texturizer mixed with a dry shampoo!
- "I then divided the hair into three sections - top, middle and nape - and clipped the sections up. Before shaping her hair with a 1/2 barrel curling iron, I loosely teased each section at the root for a good solid base. The shape of brush you choose will play a major part in the end result. I'm going for volume and for sleekness, so I used both a boar bristle brush and then a paddle brush to smooth it out so that it didn't look frizzy or wiry.
- "I used the curling iron and held it in an asymmetrical pattern because that will give you a more natural-looking style, and then I rolled the hair outward away from her face and just began tucking and pinning and creating this free-flowing but structured bun in the back of her head. While I'm doing this, I'm pinning the hair and always aiming for it to hit the crown of her head so that it can sit in place and take the desired shape, and know that as the night went on it would fall a little bit below that. But the crown of the head is a good target to aim for when creating this look. That is your bullseye for your bun.
- "Once the bun was fully set, I began pulling out a few strands from the twists in her bun so that they weren't so tight. It had more body that way which lends to that modern youthful appearance. Hair needs to look touchable and, keep in mind, as the hair settles even more it will lose a bit of that texture, but still adjust into that desired chic style, especially as the night goes on!"


![[GIVEAWAY] Clinically-Proven, Natural Hair Restoration Supplements](https://native-x.imgix.net/allured/65f1fd65b40d3e0001de7f24/yhumbnail%20image.jpg?crop=focalpoint&fit=crop&fp-x=0.5&fp-y=0.5&h=191&w=340&auto=format%2Ccompress&q=70)


