One of my favorite terms is “double identity.” We made it a company mission to speak differently this year, basically approaching the language we use in a fresh way to engage stylists, as well as guests, in the salon. "Double identity" is the phrase we now use when a cut is versatile. Versatile is so sterile and overused, it goes in one ear and out the other, but double identity is interesting and really grabs people’s attention. Try it - you’ll be amazed at how it gets the conversation flowing in a consultation.
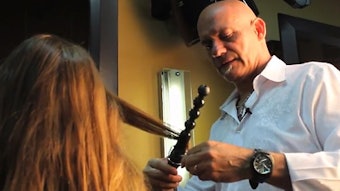
To show how passionate we are about cuts that deliver double identity, we challenged our Director of Education, Andrew Carruthers, to do a photo shoot with one model and one cut styled in multiple ways.
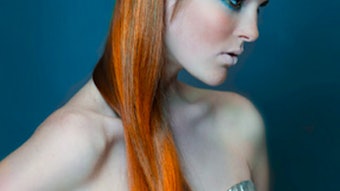
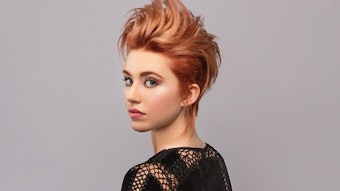
Andrew: "Our guests in the salon are asking for high value for their dollar and value comes from getting 'more' out of their service. Sure, we can only give our guests one haircut each time they come in, but if we build the shape in a way that it has flexibility and show them how they can style it in many different ways, now a single haircut has double identity! The power comes from how dramatically it can change someone’s facial structure when we shift the silhouette with different styles. Notice how dramatically different Caitlyn looks in each of these pictures and only the hair and wardrobe were changed (makeup was unchanged throughout the three shots). She literally looks like three different people and each look has its own distinct beauty and personality. As it is the hallmark of Sam Villa education, we kept things simple and incredibly approachable so that you can utilize these looks in your salon immediately."
The Cut:
- Quickly establish a soft, one-length bob shape at the most flattering point for your guest. For Caitlyn we chose to highlight her beautiful jaw line. You need this length established first to gauge the length for your layering pattern. We know you can cut a bob, so in this tutorial we will focus on the layering pattern.
- Using a Sam Villa Short Cutting Comb in a contrasting color to your guest’s hair, divide the head into 4 quadrants by first taking a section from the center of the forehead all the way to the center of the nape and then section from the top of the crown to just behind the ear where the hairline starts to drop towards the nape on both sides.
- Take a 1/2-inch pie-shaped section from either side of your center division line and combine them together so that you have a 1-inch pie-shaped section in the center back. The point of your pie should be starting at the point in the crown that your 4 quadrants all meet.
- Without over directing, elevate this section to 45 degrees above horizontal and keep your fingers perpendicular to the hair (your fingers should be at a similar angle to the crown of the head).
- With your Sam Villa Signature Series 6.25" Shear, softly point cut a length that will allow all of the hair below the occipital to fall out of your section and remain untouched.
- Take a 1/2-inch of new hair and a 1/2-inch of your previously cut section as a traveling guide. Over direct the new hair back to your guide to build weight towards the face. Pay very close to attention to the cutting line on your guide and continue a point cutting technique for flexibility in the ends.
- Continue this pattern all the way to front on both sides making sure that the point of your pie always starts at that point where your quadrants all come together in the crown.
- The beauty of pie-shaped sections is they have the unique effect of creating a lot of over direction at the wide point of the section and almost no over direction at the skinny point. So the outside edges of your haircut will build a lot of length towards the front but the area around the crown will maintain a similar length. Again, trust the cutting line in your guide section! It will change dramatically as you circle around towards the front hairline. Don't forget to crosscheck every few sections to make sure you are balanced.
Refinement:
- The area at the nape will most likely need a little weight reduction.
- Starting in the center back at the nape, take a vertical section and elevate to 90 degrees horizontal with no over direction.
- Using the Sam Villa Essential Series Reversible Blending Shear, cut a diagonal cutting line that is shortest at the nape to create a bit of internal graduation. Two to three cuts on a section should be plenty for medium density hair; 1 or 2 more may be necessary for very thick density.
- This technique allows you to maintain the strength of the perimeter and create a flattering, head-hugging silhouette! Hot Tip: Try this on all your bobs - your guests will love it!
- Soften any other areas that look heavy or blocked up by deep point cutting with the Sam Villa Signature Series 7" Dry Cutting Shear. Keep the shear fairly parallel with the grain of the hair for a soft texture or turn them more diagonally to the grain of the hair for a more aggressive "peak and valley" effect.
- For this summer season, we are loving a very light and lived in texture to the ends without over-thinning.
Continue reading to see all three looks, as well as the how-to for each unique style!
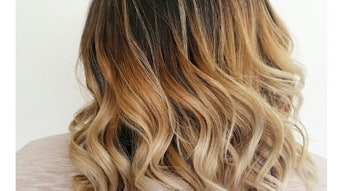
The First Look - The Classic Blow Dry:

- Prep the hair with Redken pillow proof blow dry extender and Redken guts 10.
- Using the Sam Villa Light Professional Ionic Blow Dryer and Signature Series Paddle Brush, wrap dry the hair in all directions to allow for natural root direction.
- Once the root area of the hair (Zone 1 for our Redken Family) is established, switch to the Sam Villa Signature Series Styling Brush.
- Take a diagonal back parting from the front hairline to the center back on both sides at the bottom of the round of the head. Take about 1 inch diagonal forward sections (larger for fine density or smaller for thick density) and polish the mid-shaft and ends (Zone 2 and 3) by laying the section across the Styling Brush and directing the air flow diagonally down the brush so that the heat and air flow are into the brush and down the hair strand. Move slowly down the hair to the ends. Keep the brush at a low elevation to keep the sides and back close to the head.
- Once that area is finished, move to the top and crown area.
- Continue with diagonal forward sections and the same overall technique. Use a higher elevation to allow a sense of fullness and movement through the top.
- At the front hairline, use vertical sections and give the hair a nice bend in the direction you want the fringe area to sweep towards.
- To bring out natural shine and slightly define the ends, give your finish a mist of Redken shine flash 02.
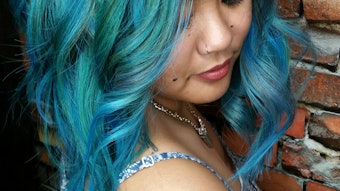
The Second Look - Sexy Summer Texture:

- Use the same diagonal back parting described in the classic blow dry to divide the back and sides from the top area of the head.
- Take 1" diagonal back partings starting at the front hairline.
- Mist your section with Redken iron shape 11 for heat protection and natural feeling hold.
- Holding the Sam Villa Signature Series Sleekr Iron parallel with the section and with the hair at 90 degrees horizontal (parallel with the floor), gently create a C shaped bend at the base of the hair (Zone 1). For the sections at the front hairline, make that first bend away from the face. Hot Tip: a soft touch at the base will help you to eliminate the chance for creases in the hair.
- Create a second C shape through the mid-strand (Zone 2) and a subtle third C shape on the ends (Zone 3) always alternating the direction of each curve.
- On the next section, start your C shape at the base, the opposite direction from the section before. This will help the texture to feel loose and not so contrived.
- After you complete the sides and back, move into the top sections.
- Use alternating triangles across the top of the head - think of a backgammon board! This also helps the texture to look more natural.
- Keep the elevation a touch lower on the top, which creates a bit of drag at the base. This stops you from creating excess volume on the top of the head.
- When you reach the fringe area, switch to a more vertical section and make sure to curve the base in the direction you want the fringe to fall. We also suggest making the texture just a little more subtle through the fringe area.
- When all sections are complete and completely cool to the touch, emulsify a small amount of Redken mess around 10 evenly through your palms and fingertips.
- Use a "scrunching" movement with your hands to break up the texture and then use your fingertips to help redefine the ends. Reapply more Redken mess around 10 as necessary!
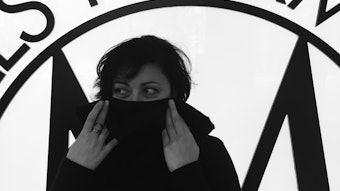
The Third Look - Elegant and Upswept:
- On dry hair, begin at the center back of the head with a vertical section, apply Redken iron shape 11 at the base (Zone 1) and directionally blow dry with the Sam Villa Professional Ionic Blow Dryer and the Sam Villa Signature Series 9-Row Finishing Brush toward the center back. Focus the nozzle right at the base area. Apply Redken guts 10 to the mid-shaft and ends (Zone 2 and 3) and use the Sam Villa Signature Series 1.5" Thermal Round Brush to curve the mids and ends towards the center back. Hot Tip: if you are restyling second or third day hair that already has a lot of product layered into it, you can lightly mist the mids and ends with good old-fashioned H2O to reactivate the existing product. Still apply the Redken iron shape 11 at the base (Zone 1) to build a solid foundation.
- As you move towards the face with your sections, allow the sections to fan out into a slightly diagonal back section and direct the hair up towards the top of the head and back instead of straight back.
- Allow the sections to criss cross across the guest’s natural part so that the part does not split into a hard line.
- Go back through your sections and puff Redken powder grip 03 texturizing hair powder into the base area (Zone 1) - don't be shy! This creates and incredible base that will last all night long.
- If the base does not have enough fullness or enough strength to hold the hair up properly, go through the same sections and imprint texture right at the base with the Sam Villa Signature Series Textur Iron. So that you do not see the texture, leave about a 1/2-inch section around the hairline out as a veil.
- Brush through the shape with the Sam Villa Signature Series Styling Brush a few times and then use your hands to shape into a beautiful silhouette.
- Finish with a healthy mist of Redken quick tease 15 and she is ready for anything the night offers her.
Do you want to offer guests options that bring their style to life, that transition them from work to weekend, day to evening, casual to polished, everyday to special day? It’s easy with this cut, and when you take the time to teach your guests how to create the looks at home, trust me, they will have fun playing with all their different identities - no theft required!
Aspire for MORE!
Sam
Credits:
Hair: Andrew Carruthers
Makeup: Jillian Brunty
Model: Caitlyn Wandvik
Photography: Andrew Carruthers