Always have a Plan B - I learned this the hard way this fall. I was scheduled to do a shoot and was excited about a concept I came up with that required a model to have her hair cut and colored. I know, a lot to ask from a model, but I was determined. I had a storyboard and I was all buttoned up and ready to roll. The problem was, we couldn’t find a model, and instead of coming up with a Plan B, the shoot was rescheduled...and I realize now that I should have had a Plan B.
I understand that circumstances affect the ability to shift concepts, if you’re doing a shoot for marketing or an ad campaign, and the concept is extremely specific with no creative interpretation, you just have to stick with Plan A and make it work at all costs. But, if you’re doing a creative shoot for your book, NAHA, a creative collaborate with friends or an editorial magazine shoot, ALWAYS have a Plan B….and a killer session kit.
Trust me, the killer session kit will save you, if it’s a complete kit, it is what will allow you to create anything at anytime with confidence. And, the beauty about a session kit is, it can be assembled in phases over time, so you don’t need to feel the impact of the cost straight out of beauty school. Geneva Cowen, Artistic Director for Sam Villa, shoots just about every week, from Alaska to New York, so I thought I’d give you some insight into her session kit and breakdown each phase. Also, keep in mind that eventually you want to have a kit stocked with tools specifically for editorial work that are separate from your salon tools - things tend to get lost during traveling and the wear and tear of transporting items can be rough on them…plus, you never want to arrive at the salon and be surprised that something is missing or broken when you need it for a client. So in the beginning, definitely share tools if you have to, but work your way up to having a separate set. It takes a few years to build up a kit, and once it’s finished, it pretty much includes everything but the kitchen sink…we laugh about our luggage all the time, we do NOT travel light. Geneva advises to break down the kit into three phases to manage the financial commitment, once one phase is complete – move on to the next.
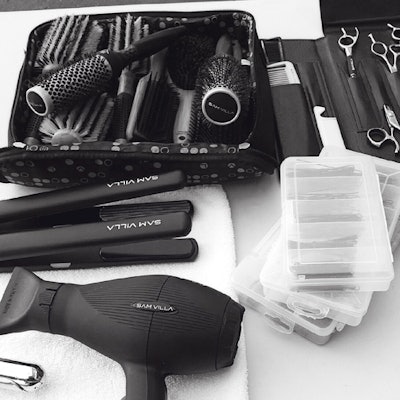
Flat Iron
- Texturizing Iron – The Sam Villa Textur iron adds interesting texture and builds a foundation for curl and updo’s.
- Small Round Brush - Adds volume and curl to shorter hair
- Medium Oval Brush - Creates waves and loose curls on medium length hair
- Large Oval Brush – Creates loose waves and movement on longer hair
- Styling Brush - For general smoothing, brushing out teasing and to add polish to finishes
- 9-Row Brush – Good for directional and wrap drying on shorter hair
- Paddle Brush – Detangles and is good for wrap drying on sort to medium length hair
- 1" Thermal Brush – Achieves frothy volume and tighter curls on shorter hair
- 1.5" Thermal Brush – Increases volume and forms loose curls on medium length hair
- 2" Thermal Brush – Achieves smooth waves and flexible curves on longer hair
- A Good Comb Set – Use black combs on light hair and light combs on dark hair for maximum contrast and precision.
- A Compact, light-weight, powerful dryer – The Sam Villa Professional Ionic Blow Dryer weighs less than 1 pound, it’s great for session kits.
- Sam Villa Signature Series 6.25 Wet Cutting Shear
- Sam Villa Razor
- Sam Villa Reversible Blending Shear
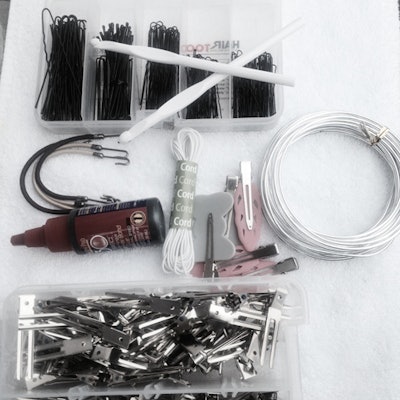
- Bobby Pins or Grips
- 2” and 2.5” Brown and Black Hair Pins
- 2.5” and 3” Brown and Black Curl Clips (single and double prong)
- Duckbill Clips TIP: Organize your pin kit by color, so you don’t have to dig around, just grab and go
- 1” Marcel Curling Iron
- ¾” Marcel Curling Iron
- Bungees (elastic with hooks on the ends for ponytails, in multiple colors)
- Rubber Bands (black and clear)
- Power Strip - Not every location has ample availability to plug in
- Water Bottle
- Protein Bars
- Cape
- Towels
- Dry Shampoo – Redken Powder Refresh 01 is AWESOME!!
Phase 2
- 5/8” Marcel Curling Iron
- ½” Marcel Curling Iron
- 1 ¼” Marcel Curling Iron
- Tripod and Mannequin - for practice
- Hair Forms (all sizes and colors)
- Large Plastic Needles- Using a small hairpin you can thread hair into the needle to sew shapes into the hair
- Elastic Cord (in brown and black)
- Synthetic Hair (all colors) – Used for filler and to add density to shapes
- Colored Hairspray and Temporary Hair Color
Phase 3
- Human Hair Extensions 18” (in a range of colors) - Adds density and volume to shapes, some synthetic fibers melt with heat, human hair does not.
- Extension Glue and Remover - Eyelash glue is a non-aggressive adhesive that works well for temporary hair extensions and is water-soluble.
- Wig Block - It is amazing for set work and wigs
- Wig Caps
- Human Hair Wigs
- T-Pins - Good for pinning extensions to mannequin heads or to set wig blocks
- Sewing Kit (for extensions)
- Hair Extension Clips
- Curved Large Needles – For sewing in extensions to cornrows
- Crochet Hooks - For braids and designs
- Hook Latch - For braids
- Craft Scissors - To cut extensions and forms
- Glue Gun - You never know!
- Wire - To secure shapes or heated with a blow dryer to create texture
- Wire Cutters
I have since done the rescheduled shoot, and I’m really happy with the outcome, but you can bet your bottom dollar I had a Plan B that I was ready to break out on a moments notice! And, I could have, because I had a KILLER session kit to back me up!
Aspire for MORE!
Sam


